How to Install LED Aluminum Profiles for Linear Lights?
LED aluminum profiles are essential components for installing LED strip lights. They help to protect your LED strips, improve heat dissipation, and enhance the overall aesthetic of your lighting setup. If you’re looking to install LED aluminum profiles in your home or office, follow this simple step-by-step guide. As a professional LED aluminum profile manufacturer from China, we’ll also share helpful tips and provide insight into choosing the right profiles for your LED strip lights.
Learn how to install LED aluminum profiles for linear lighting step by step. Discover how to protect your LED strips, improve heat dissipation, and create an elegant lighting effect with these easy-to-follow instructions from a leading China LED aluminum profile supplier.
Installing LED aluminum profiles is not only about improving the performance of your LED strip lights, but it also adds a sleek and modern touch to your lighting design. Whether you're lighting up a kitchen, office, or outdoor space, these profiles can be used for various applications. Let’s break down the installation process to make it simple for you.
What Are LED Aluminum Profiles?
LED aluminum profiles are specially designed channels that house LED strip lights. These profiles are made from high-quality aluminum, which helps with heat dissipation, extending the lifespan of your LED strips. They are available in different sizes, shapes, and finishes to fit various lighting needs and interior designs. LED aluminum profiles, also known as LED aluminum extrusions or channels, are essential for creating professional-looking LED installations.
What Tools Do You Need to Install LED Aluminum Profiles?
To properly install LED aluminum profiles, you will need the following tools:
- Screwdriver (for securing the profiles)
- Measuring Tape (for precise measurements)
- Miter Saw (for cutting profiles to the desired length)
- Drill (for making mounting holes)
- Adhesive or Screws (depending on the mounting method)
- LED Strips (make sure they fit into the profile)
These tools will help you complete the installation process quickly and accurately.
How to Install LED Aluminum Profiles Step by Step?
Follow these simple steps to install your LED aluminum profiles:
- Measure and Plan the Installation Area: Start by measuring the area where you want to install the LED aluminum profiles. Mark the points where the profiles will be placed, ensuring they are evenly spaced and aligned.
- Cut the Profiles to the Desired Length: Use a miter saw or hacksaw to cut the LED aluminum profiles to the required length. Be sure to wear safety glasses and gloves while cutting.
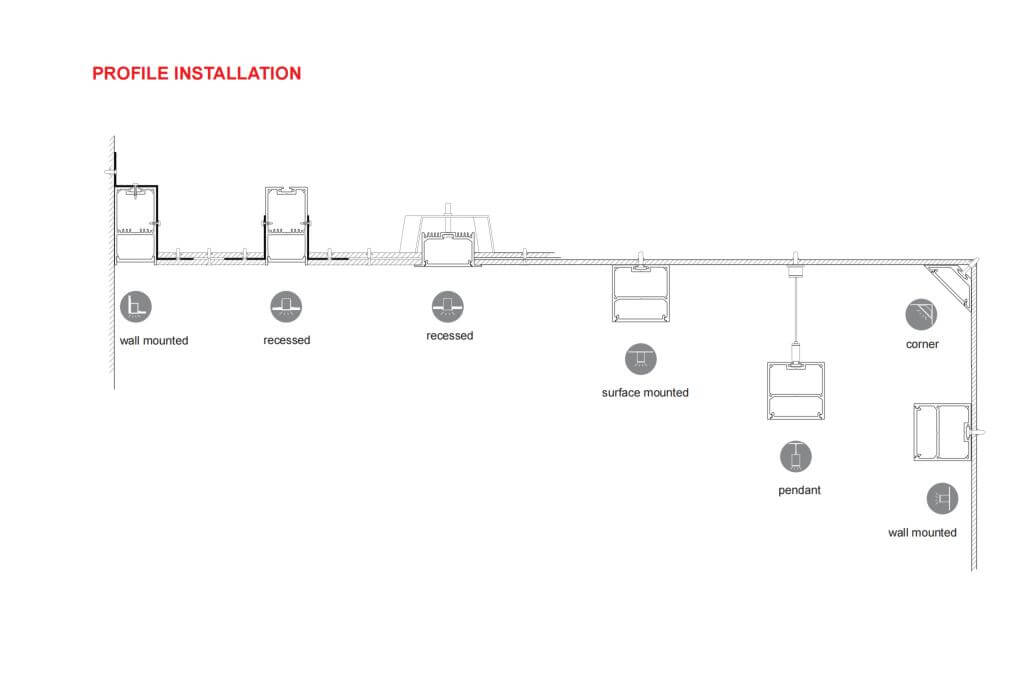
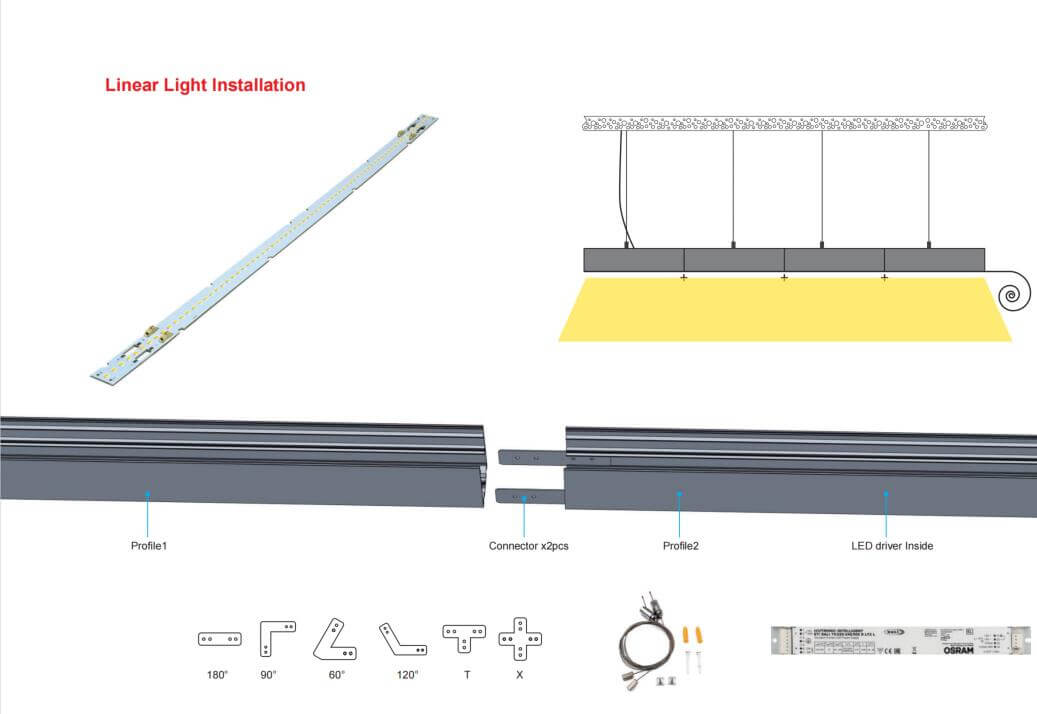
- Attach the Mounting Clips or Brackets: Depending on your profile design, you may need to use mounting clips or brackets to hold the profiles in place. Attach these to the wall or ceiling where the profiles will be installed.
- Insert the LED Strip Lights: Once the profile is securely mounted, carefully insert the LED strip lights into the aluminum channel. Make sure the LED strips are properly aligned and fit snugly within the profile.
- Connect the LED Strips to Power: Use the appropriate connectors or solder the wires to connect your LED strips to the power source. Ensure the voltage and power requirements are matched to avoid damage.
- Secure the Profile and Finish the Installation: Finally, secure the LED aluminum profiles to the mounting clips or brackets. If using adhesive, ensure it is properly bonded and holds the profile in place.
※ Claim 1: Ensure your LED aluminum profiles are compatible with the LED strips you're using to achieve optimal light output and cooling performance.
※ Claim 2: Make sure to check for any heat management issues when installing LED aluminum profiles in closed spaces to maintain the longevity of your LEDs.
What Are the Benefits of Using LED Aluminum Profiles?
LED aluminum profiles provide several advantages:
- Enhanced Heat Dissipation: The aluminum helps dissipate heat, preventing overheating and extending the lifespan of your LED strips.
- Improved Aesthetics: These profiles give your lighting setup a professional and sleek look, blending seamlessly with the interior design.
- Durability: LED aluminum channels are sturdy and protect your LED strips from physical damage and dust.
- Better Light Distribution: The profiles allow for uniform light diffusion, avoiding the “dots” effect often seen with bare LED strips.
How to Choose the Right LED Aluminum Profiles?
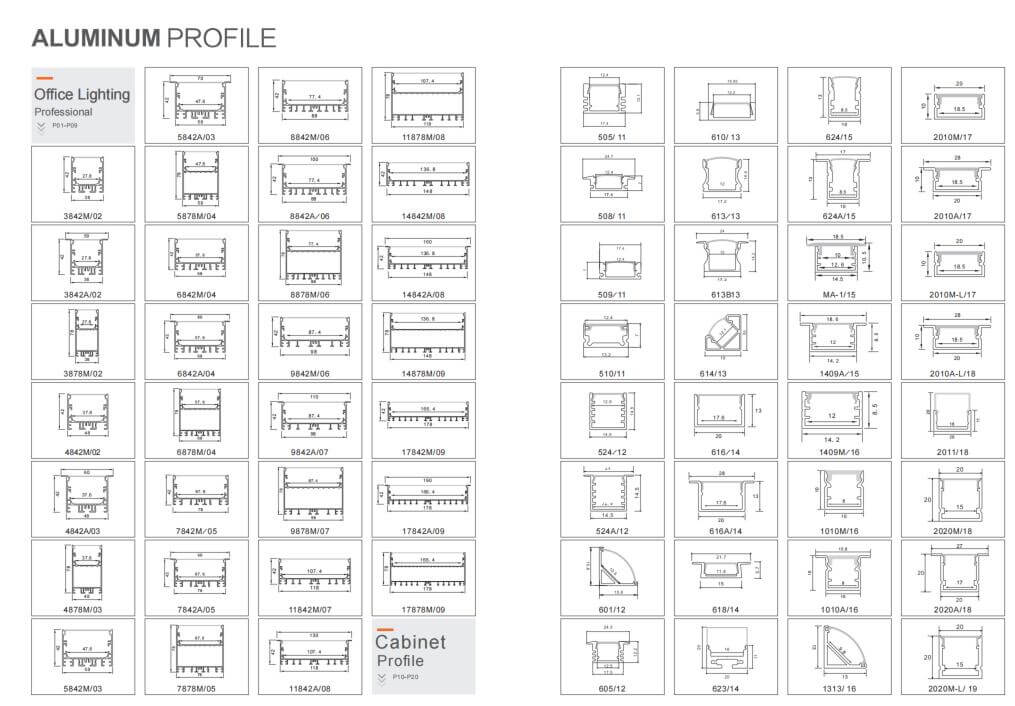
Choosing the right LED aluminum profile depends on several factors:
- Size and Shape: Consider the available space and the type of lighting effect you want to achieve.
- Mounting Type: Profiles can be surface-mounted, recessed, or suspended. Choose the one that suits your installation method.
- Finish: Opt for profiles with finishes that match the design of your room, such as anodized aluminum, matte black, or white.
※ Claim 1: As a leading China LED aluminum profile supplier, we offer a wide range of profiles to suit various installation needs and lighting effects.
※ Claim 2: You can find detailed information about our products and services on our website: Lightstec LED Aluminum Profiles.
Fazit
Installing LED aluminum profiles is an excellent way to enhance the performance and appearance of your LED strip lights. By following these simple steps, you can achieve professional-looking lighting installations with ease. Whether you’re using LED strips for home decor or commercial spaces, these profiles will improve the longevity and efficiency of your lighting.
Q&A
1. Can I use any LED strip with aluminum profiles? Yes, as long as the LED strip fits into the profile, you can use any LED strip. Make sure the voltage and power ratings match.
2. How do I choose the right LED aluminum profile for my project? Consider the size, shape, and finish of the profiles to match your design needs. Also, choose profiles that fit your LED strips properly.
3. Do LED aluminum profiles improve light performance? Yes, they enhance heat dissipation, which helps maintain the performance and lifespan of your LED strips.
4. Can I install LED aluminum profiles outdoors? Yes, but ensure the profiles are designed for outdoor use and are properly sealed to prevent damage from weather.
5. How can I install LED aluminum profiles without drilling holes? You can use adhesive backing for a no-drill installation, though it may not be as sturdy as screws or clips.
People Also Care About These Questions:
- How to choose the right LED aluminum profiles for your project?
- What are the benefits of using LED aluminum extrusions?
- How to properly install LED strip lights in aluminum channels?
- What are the most common mistakes when installing LED aluminum profiles?
- What is the difference between LED aluminum channels and profiles?
Herstellungsprozess von LED-Lichtbändern
Die Produktion von LED-Leuchten erfordert hohe Präzision, aber viele Hersteller stellen ihre Leuchten auf einfachen Montagelinien her. Wir regulieren und überwachen alle Verarbeitungsschritte in unserem Fertigungssystem streng. Wir verfügen auch über eine vollständige Ausrüstung für die Produktion und Qualitätskontrolle. Wir beschäftigen erfahrene Ingenieure, die auch Werksleiter sind, um eine strenge Qualitätskontrolle für jeden einzelnen LED-Streifen zu gewährleisten.
Wir hoffen, dass dieser Beitrag Ihr Verständnis für die LED-Beleuchtungsindustrie erweitert und es Ihnen ermöglicht, die Produktlinie weiterzuentwickeln und zu erkunden.

Schritt 1. LED-Streifenlichtmaterial IQC
Im Werk angekommene Materialien, unabhängig von Leiterplatte, LED, IC, Widerstand, Aluminiumprofil, Kabel, müssen einer QC-Prüfung unterzogen werden. Alle Artikel müssen die Anforderungen erfüllen. Die Qualitätskontrolle ist das erste, was wir tun müssen, wenn alle Materialien ankommen. Wir müssen sie prüfen, ob sie qualifiziert sind oder nicht --- es kann jedoch immer noch einige fehlerhafte Produkte geben, die den gesamten Produktionsprozess durchlaufen haben --- Material-, Verarbeitungs- oder Versandfehler.

Schritt 2. Prüfung der LED-Farbtemperatur
Jetzt müssen Sie bei allen neuen LED-Chips die Farbtemperatur der LEDs testen. Die Helligkeit der gleichen Farbe ist nicht immer gleich. Auch der Farbwiedergabeindex ist ein Thema, auf das Sie beim Kunden achten müssen.

Schritt 3. LED-Trockenprozess
Normalerweise folgt auf diesen Prozess der SMT-Prozess. LED muss getrocknet werden, bevor sie SMT verarbeitet. Die Trocknungstemperatur beträgt nicht weniger als 65℃ in 8 Stunden.
Schritt 4. LED-Streifenlicht SMT-Prozess
Der SMT-Prozess für LED-Streifenlichter wird häufig in modernen Beleuchtungseinheiten eingesetzt. Komisch ist, dass SMT für Surface Mount Technology steht, aber die Technologie zur Herstellung der LED heißt nicht nur Mount Surface, sondern beinhaltet auch eine automatisierte Hochgeschwindigkeitsmaschine. Viele Menschen missverstehen dies.

Schritt 5. LED-Streifenlicht-Reflow-Lötprozess
Reflow-Löttechnologieprozess nach SMT, den Komponenten und der Leiterplatte unter Verwendung der Lötpaste. Die Leiterplatte aus der Reflow-Lötmaschine auf eine bestimmte Temperatur bringen. Die Lötpaste in die flüssige Konsistenz geschmolzen und dann mit verschiedenen Komponenten verbunden.

Schritt 6. Inspektionsprozess für LED-Streifen
Wir haben einen 100%-Test, um sicherzustellen, dass die Produkte keine physischen Schäden aufweisen. Die Sichtprüfung stellt sicher, dass es keine Farbverschiebung der LEDs gibt und ob irgendwelche Komponenten in Lötbrücken falsch ausgerichtet sind.


Schritt 7. Lötprozess für LED-Streifen
Einige kleine Leiterplatten mit dem bleifreien Lötprozess mit Nullwinkel. Nach der Inspektion durchläuft das LED-Band eine Lötmaschine, die 0,5 m langes Band mit 5 m langen Streifen verbindet.

Schritt 8. Reinigen der LED-Leiterplatte
Die Leiterplattenoberfläche für den LED-Streifen muss mit einem Lötkolben gereinigt werden. Das erste, was zu tun ist, ist noch Löten. Löten Sie den IC kann verwendet werden, um Oxidation während des Lötvorgangs zu verhindern, und schneiden Sie dann den überschüssigen Anschlussdraht in eine runde Zahnpastatrommel wie Oxidation ab. Nachdem dies alles erledigt ist, können wir mit der Reinigung fortfahren.

Schritt 9. Alterungsprozess der LED-Streifen
Tatsächlich benötigen alle LED-Produkte einen Beleuchtungstest für 8 Stunden, um sicherzustellen, dass jede LED in gutem Zustand läuft. Und wir können beim Beleuchtungstest die Farben messen, ob die LEDs die richtige Farbtemperatur haben und ob der Treiber gut funktioniert. Daher ist dies sehr wichtig für den Hersteller, um sicherzustellen, dass alle LEDs in Ordnung sind.
Schritt 10. Wasserdichter LED-Streifen
LED-Streifen sind wasserdicht und auch rostbeständig, wodurch sie für eine Reihe von Anwendungen innerhalb und außerhalb des Hauses geeignet sind. Die Auswahl des Wasserdichtigkeitsprozesses für LED-Streifen ist ein wichtiger Schritt im Herstellungsprozess. Auf dem Markt sind hochwertige IP65-Silikonschläuche wasserdicht und IP67-Silikonspritzguss erhältlich.

Schritt 11. LED-Streifenlicht fügen 3M-Bandprozess hinzu
Das 3M-Klebeband auf der Rückseite des Streifens bietet Verbrauchern Komfort und Leichtigkeit bei der Installation von LED-Streifen.
Wir verwenden 3M 9080 für alle nicht wasserdichten und wasserdichten Streifen, einige Kunden fordern andere 3M-Klebstoffe mit besserer Klebrigkeit oder besserer Wärmeleitfähigkeit, die ebenfalls erhältlich sind.

Schritt 12. Endkontrolle der LED-Streifen
Nachdem das gesamte LED-Streifenpaket unsere Verarbeitung durchlaufen hat, führt die Qualitätskontrollabteilung von LED Starlight eine Endkontrolle unserer Produkte durch. Wir achten nicht nur darauf, dass sie die gleiche Lichtfarbe haben und frei von Mängeln sind, sondern auch, dass das Aussehen gut genug ist, um die Anforderungen der Kunden zu erfüllen.
