Come installare profili in alluminio LED per luci lineari?
LED aluminum profiles are essential components for installing LED strip lights. They help to protect your LED strips, improve heat dissipation, and enhance the overall aesthetic of your lighting setup. If you’re looking to install LED aluminum profiles in your home or office, follow this simple step-by-step guide. As a professional LED aluminum profile manufacturer from China, we’ll also share helpful tips and provide insight into choosing the right profiles for your LED strip lights.
Learn how to install LED aluminum profiles for linear lighting step by step. Discover how to protect your LED strips, improve heat dissipation, and create an elegant lighting effect with these easy-to-follow instructions from a leading China LED aluminum profile supplier.
Installing LED aluminum profiles is not only about improving the performance of your LED strip lights, but it also adds a sleek and modern touch to your lighting design. Whether you're lighting up a kitchen, office, or outdoor space, these profiles can be used for various applications. Let’s break down the installation process to make it simple for you.
What Are LED Aluminum Profiles?
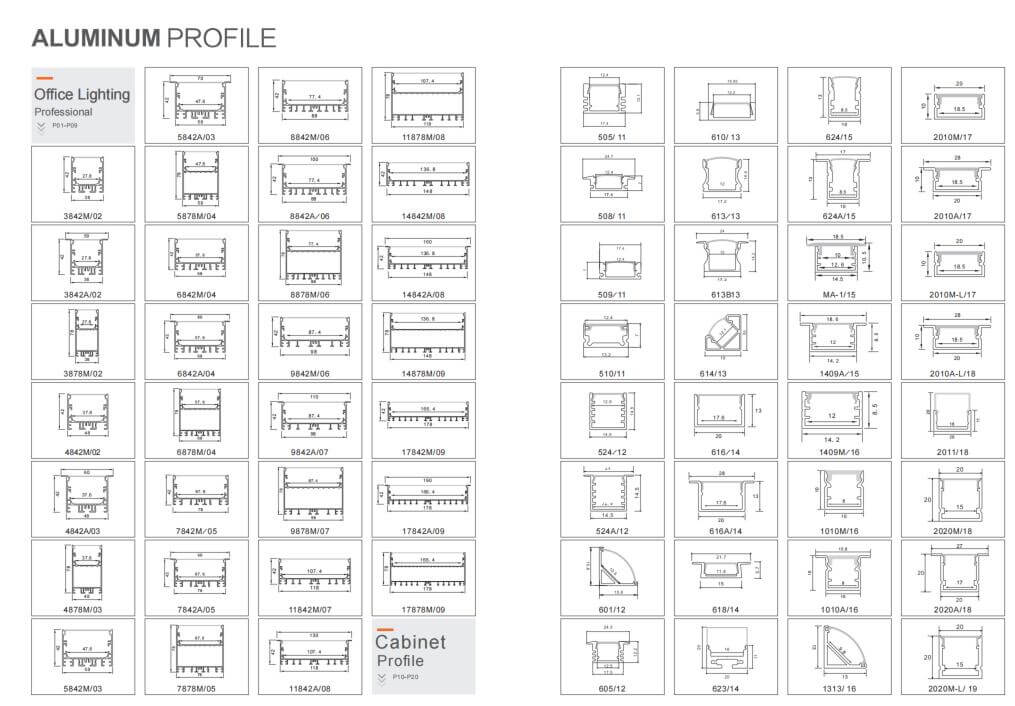
LED aluminum profiles are specially designed channels that house LED strip lights. These profiles are made from high-quality aluminum, which helps with heat dissipation, extending the lifespan of your LED strips. They are available in different sizes, shapes, and finishes to fit various lighting needs and interior designs. LED aluminum profiles, also known as LED aluminum extrusions or channels, are essential for creating professional-looking LED installations.
What Tools Do You Need to Install LED Aluminum Profiles?
To properly install LED aluminum profiles, you will need the following tools:
- Screwdriver (for securing the profiles)
- Measuring Tape (for precise measurements)
- Miter Saw (for cutting profiles to the desired length)
- Drill (for making mounting holes)
- Adhesive or Screws (depending on the mounting method)
- LED Strips (make sure they fit into the profile)
These tools will help you complete the installation process quickly and accurately.
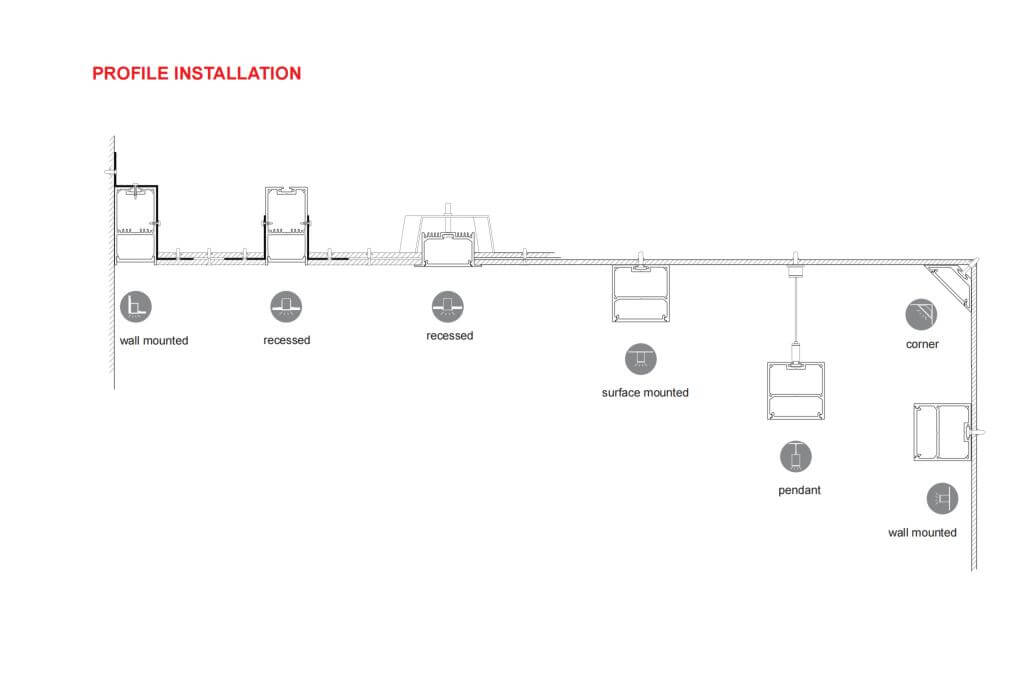
How to Install LED Aluminum Profiles Step by Step?
Follow these simple steps to install your LED aluminum profiles:
- Measure and Plan the Installation Area: Start by measuring the area where you want to install the LED aluminum profiles. Mark the points where the profiles will be placed, ensuring they are evenly spaced and aligned.
- Cut the Profiles to the Desired Length: Use a miter saw or hacksaw to cut the LED aluminum profiles to the required length. Be sure to wear safety glasses and gloves while cutting.
- Attach the Mounting Clips or Brackets: Depending on your profile design, you may need to use mounting clips or brackets to hold the profiles in place. Attach these to the wall or ceiling where the profiles will be installed.
- Insert the LED Strip Lights: Once the profile is securely mounted, carefully insert the LED strip lights into the aluminum channel. Make sure the LED strips are properly aligned and fit snugly within the profile.
- Connect the LED Strips to Power: Use the appropriate connectors or solder the wires to connect your LED strips to the power source. Ensure the voltage and power requirements are matched to avoid damage.
- Secure the Profile and Finish the Installation: Finally, secure the LED aluminum profiles to the mounting clips or brackets. If using adhesive, ensure it is properly bonded and holds the profile in place.
※ Claim 1: Ensure your LED aluminum profiles are compatible with the LED strips you're using to achieve optimal light output and cooling performance.
※ Claim 2: Make sure to check for any heat management issues when installing LED aluminum profiles in closed spaces to maintain the longevity of your LEDs.
What Are the Benefits of Using LED Aluminum Profiles?
LED aluminum profiles provide several advantages:
- Enhanced Heat Dissipation: The aluminum helps dissipate heat, preventing overheating and extending the lifespan of your LED strips.
- Improved Aesthetics: These profiles give your lighting setup a professional and sleek look, blending seamlessly with the interior design.
- Durability: LED aluminum channels are sturdy and protect your LED strips from physical damage and dust.
- Better Light Distribution: The profiles allow for uniform light diffusion, avoiding the “dots” effect often seen with bare LED strips.
How to Choose the Right LED Aluminum Profiles?
Choosing the right LED aluminum profile depends on several factors:
- Size and Shape: Consider the available space and the type of lighting effect you want to achieve.
- Mounting Type: Profiles can be surface-mounted, recessed, or suspended. Choose the one that suits your installation method.
- Finish: Opt for profiles with finishes that match the design of your room, such as anodized aluminum, matte black, or white.
※ Claim 1: As a leading China LED aluminum profile supplier, we offer a wide range of profiles to suit various installation needs and lighting effects.
※ Claim 2: You can find detailed information about our products and services on our website: Lightstec LED Aluminum Profiles.
Conclusione
Installing LED aluminum profiles is an excellent way to enhance the performance and appearance of your LED strip lights. By following these simple steps, you can achieve professional-looking lighting installations with ease. Whether you’re using LED strips for home decor or commercial spaces, these profiles will improve the longevity and efficiency of your lighting.
Q&A
1. Can I use any LED strip with aluminum profiles? Yes, as long as the LED strip fits into the profile, you can use any LED strip. Make sure the voltage and power ratings match.
2. How do I choose the right LED aluminum profile for my project? Consider the size, shape, and finish of the profiles to match your design needs. Also, choose profiles that fit your LED strips properly.
3. Do LED aluminum profiles improve light performance? Yes, they enhance heat dissipation, which helps maintain the performance and lifespan of your LED strips.
4. Can I install LED aluminum profiles outdoors? Yes, but ensure the profiles are designed for outdoor use and are properly sealed to prevent damage from weather.
5. How can I install LED aluminum profiles without drilling holes? You can use adhesive backing for a no-drill installation, though it may not be as sturdy as screws or clips.
People Also Care About These Questions:
- How to choose the right LED aluminum profiles for your project?
- What are the benefits of using LED aluminum extrusions?
- How to properly install LED strip lights in aluminum channels?
- What are the most common mistakes when installing LED aluminum profiles?
- What is the difference between LED aluminum channels and profiles?
Processo di produzione di strisce luminose a LED
La produzione di illuminazione a LED richiede un'elevata precisione, ma molti produttori realizzano le loro luci su linee di assemblaggio di base. Regoliamo e monitoriamo rigorosamente tutte le fasi di lavorazione nel nostro sistema di produzione. Abbiamo anche una serie completa di attrezzature designate per la produzione e il controllo di qualità. Ci avvaliamo di ingegneri esperti che sono anche supervisori di fabbrica per garantire un rigoroso controllo di qualità per ogni singola striscia luminosa a LED.
Ci auguriamo che questo post aumenti la tua comprensione del settore dell'illuminazione a LED e ti permetta di sviluppare ed esplorare ulteriormente la linea di prodotti.

Passaggio 1. Materiale per strisce LED IQC
I materiali sono arrivati in fabbrica, non importa PCB, led, ic, resistenza, profilo in alluminio, cavi, necessitano di controllo QC. tutti gli elementi devono soddisfare il requisito. Il controllo di qualità è la prima cosa che dobbiamo fare quando tutti i materiali arrivano. Dobbiamo ispezionarli se sono qualificati o meno --- tuttavia, potrebbero esserci ancora alcuni prodotti difettosi che hanno attraversato l'intero processo di produzione --- difetti nei materiali, nella lavorazione o nella spedizione.

Passaggio 2. Controllo della temperatura del colore del LED
Ora, con tutti i nuovi chip led, è necessario testare la temperatura del colore dei LED. La luminosità dello stesso colore non è sempre la stessa. L'indice di resa cromatica è anche un argomento che devi assicurarti al cliente.

Passaggio 3. Processo a LED a secco
Di solito, questo processo sarà seguito dal processo SMT. Il LED deve essere asciugato prima di elaborare SMT. La temperatura dell'essiccazione non è inferiore a 65 ℃ in 8 ore.
Passaggio 4. Processo SMT con striscia LED
Il processo SMT a strisce LED è ampiamente utilizzato nelle moderne unità di illuminazione. La cosa divertente è che SMT sta per Surface Mount Technology, ma la tecnologia su come produrre il LED non è solo chiamata superficie di montaggio, ma include anche una macchina automatizzata ad alta velocità. Molte persone lo fraintendono.

Passaggio 5. Processo di saldatura a rifusione con striscia LED
Processo di tecnologia di saldatura a riflusso dopo SMT, componenti e PCB utilizzando la pasta saldante. Il PCB dalla saldatrice a riflusso in una certa temperatura. La pasta per saldatura nella consistenza liquida di fuso, e poi legato a diversi componenti.

Passaggio 6. Processo di ispezione della striscia LED
abbiamo un test al 100% per assicurarci che non vi siano danni fisici ai prodotti. L'ispezione visiva assicura che non vi sia alcun cambiamento di colore nei LED e se i componenti sono disallineati nei ponti di saldatura.


Passaggio 7. Processo di saldatura della striscia LED
Alcuni PCB di piccole dimensioni con angolo zero, processo di saldatura senza piombo. Dopo l'ispezione, il nastro LED passa attraverso una saldatrice, che collega un nastro da 0,5 m a strisce lunghe 5 m.

Passaggio 8. Processo di pulizia PCB con striscia LED
La superficie PCB per la striscia LED ha un saldatore da pulire. La prima cosa da fare è ancora la saldatura. Saldare l'IC può essere utilizzato per prevenire l'ossidazione durante il processo di saldatura, quindi tagliare il filo di piombo in eccesso in un tamburo di dentifricio rotondo, come l'ossidazione. Dopo che tutto questo è stato completato, possiamo continuare a pulirlo.

Passaggio 9. Processo di invecchiamento della striscia LED
Infatti, tutti i prodotti a led necessitano di un test di illuminazione per 8 ore, per garantire che ogni LED funzioni in buone condizioni. E possiamo misurare i colori durante il test di illuminazione e se i LED hanno la giusta temperatura di colore e se il driver funziona bene. Quindi questo è molto importante per il produttore per assicurarsi che tutti i LED siano a posto.
Passaggio 10. Processo impermeabile con striscia LED
Le strisce luminose a LED sono impermeabili e anche resistenti alla ruggine, il che le rende adatte per una serie di applicazioni all'interno e all'esterno della casa. La selezione del processo di impermeabilizzazione delle strisce LED è un passo importante nel processo di produzione. Sul mercato sono disponibili tubi in silicone IP65 di alta qualità impermeabili e impermeabili per iniezione di silicone IP67.

Passaggio 11. La striscia luminosa a LED aggiunge il processo a nastro 3M
Il nastro 3M sul retro della striscia offre ai consumatori praticità e facilità nell'installazione dell'illuminazione a strisce LED.
Utilizziamo 3M 9080 per tutte le strisce non impermeabili e impermeabili, alcuni clienti richiedono altri adesivi 3M con una migliore viscosità o una migliore conduttività termica, anch'essi disponibili.

Passaggio 12. Ispezione finale della striscia LED
Dopo che l'intero pacchetto di strisce LED è passato attraverso la nostra lavorazione, il reparto di controllo qualità di LED Starlight eseguirà un controllo finale sui nostri prodotti. Non solo ci assicuriamo che abbiano lo stesso colore di illuminazione e siano privi di difetti, ma anche che l'aspetto sia abbastanza buono da soddisfare le esigenze dei clienti.