How to Install LED Aluminum Profiles for Linear Lights?
LED aluminum profiles are essential components for installing LED strip lights. They help to protect your LED strips, improve heat dissipation, and enhance the overall aesthetic of your lighting setup. If you’re looking to install LED aluminum profiles in your home or office, follow this simple step-by-step guide. As a professional LED aluminum profile manufacturer from China, we’ll also share helpful tips and provide insight into choosing the right profiles for your LED strip lights.
Learn how to install LED aluminum profiles for linear lighting step by step. Discover how to protect your LED strips, improve heat dissipation, and create an elegant lighting effect with these easy-to-follow instructions from a leading China LED aluminum profile supplier.
Installing LED aluminum profiles is not only about improving the performance of your LED strip lights, but it also adds a sleek and modern touch to your lighting design. Whether you're lighting up a kitchen, office, or outdoor space, these profiles can be used for various applications. Let’s break down the installation process to make it simple for you.
What Are LED Aluminum Profiles?
LED aluminum profiles are specially designed channels that house LED strip lights. These profiles are made from high-quality aluminum, which helps with heat dissipation, extending the lifespan of your LED strips. They are available in different sizes, shapes, and finishes to fit various lighting needs and interior designs. LED aluminum profiles, also known as LED aluminum extrusions or channels, are essential for creating professional-looking LED installations.
What Tools Do You Need to Install LED Aluminum Profiles?
To properly install LED aluminum profiles, you will need the following tools:
- Screwdriver (for securing the profiles)
- Measuring Tape (for precise measurements)
- Miter Saw (for cutting profiles to the desired length)
- Drill (for making mounting holes)
- Adhesive or Screws (depending on the mounting method)
- LED Strips (make sure they fit into the profile)
These tools will help you complete the installation process quickly and accurately.
How to Install LED Aluminum Profiles Step by Step?
Follow these simple steps to install your LED aluminum profiles:
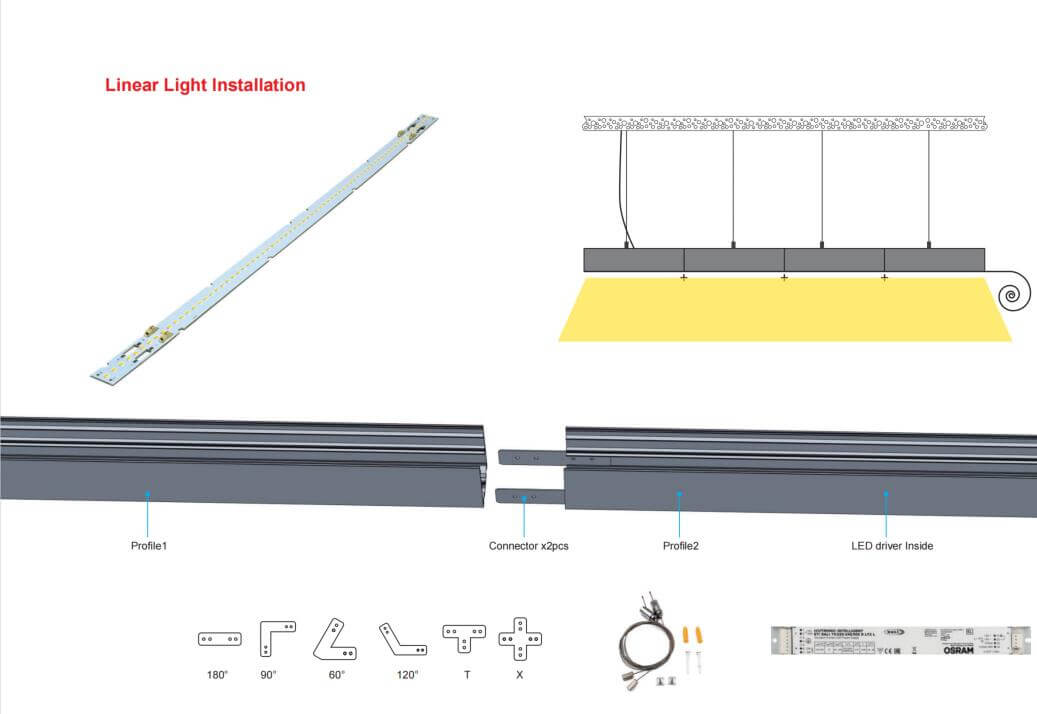
- Measure and Plan the Installation Area: Start by measuring the area where you want to install the LED aluminum profiles. Mark the points where the profiles will be placed, ensuring they are evenly spaced and aligned.
- Cut the Profiles to the Desired Length: Use a miter saw or hacksaw to cut the LED aluminum profiles to the required length. Be sure to wear safety glasses and gloves while cutting.
- Attach the Mounting Clips or Brackets: Depending on your profile design, you may need to use mounting clips or brackets to hold the profiles in place. Attach these to the wall or ceiling where the profiles will be installed.
- Insert the LED Strip Lights: Once the profile is securely mounted, carefully insert the LED strip lights into the aluminum channel. Make sure the LED strips are properly aligned and fit snugly within the profile.
- Connect the LED Strips to Power: Use the appropriate connectors or solder the wires to connect your LED strips to the power source. Ensure the voltage and power requirements are matched to avoid damage.
- Secure the Profile and Finish the Installation: Finally, secure the LED aluminum profiles to the mounting clips or brackets. If using adhesive, ensure it is properly bonded and holds the profile in place.
※ Claim 1: Ensure your LED aluminum profiles are compatible with the LED strips you're using to achieve optimal light output and cooling performance.
※ Claim 2: Make sure to check for any heat management issues when installing LED aluminum profiles in closed spaces to maintain the longevity of your LEDs.
What Are the Benefits of Using LED Aluminum Profiles?
LED aluminum profiles provide several advantages:
- Enhanced Heat Dissipation: The aluminum helps dissipate heat, preventing overheating and extending the lifespan of your LED strips.
- Improved Aesthetics: These profiles give your lighting setup a professional and sleek look, blending seamlessly with the interior design.
- Durability: LED aluminum channels are sturdy and protect your LED strips from physical damage and dust.
- Better Light Distribution: The profiles allow for uniform light diffusion, avoiding the “dots” effect often seen with bare LED strips.
How to Choose the Right LED Aluminum Profiles?
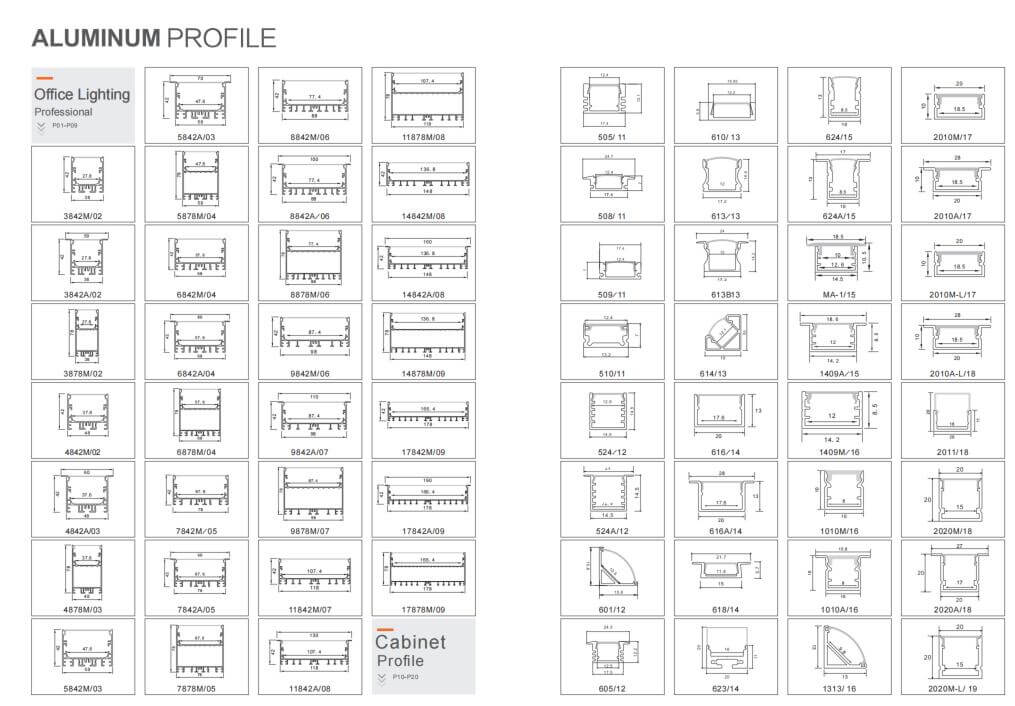
Choosing the right LED aluminum profile depends on several factors:
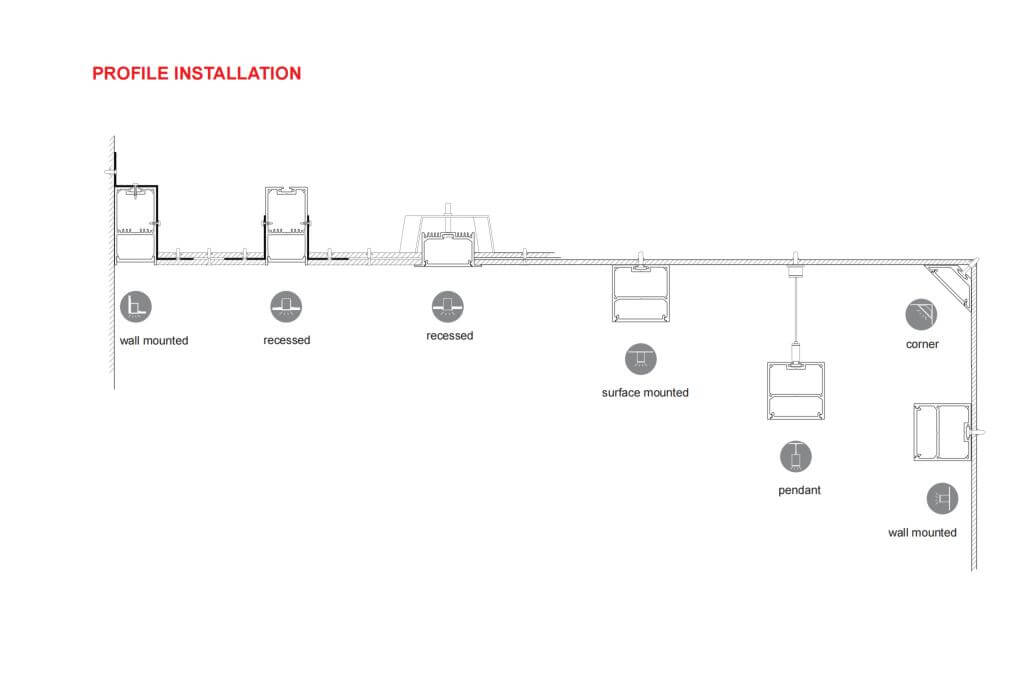
- Size and Shape: Consider the available space and the type of lighting effect you want to achieve.
- Mounting Type: Profiles can be surface-mounted, recessed, or suspended. Choose the one that suits your installation method.
- Finish: Opt for profiles with finishes that match the design of your room, such as anodized aluminum, matte black, or white.
※ Claim 1: As a leading China LED aluminum profile supplier, we offer a wide range of profiles to suit various installation needs and lighting effects.
※ Claim 2: You can find detailed information about our products and services on our website: Lightstec LED Aluminum Profiles.
Conclusie
Installing LED aluminum profiles is an excellent way to enhance the performance and appearance of your LED strip lights. By following these simple steps, you can achieve professional-looking lighting installations with ease. Whether you’re using LED strips for home decor or commercial spaces, these profiles will improve the longevity and efficiency of your lighting.
Q&A
1. Can I use any LED strip with aluminum profiles? Yes, as long as the LED strip fits into the profile, you can use any LED strip. Make sure the voltage and power ratings match.
2. How do I choose the right LED aluminum profile for my project? Consider the size, shape, and finish of the profiles to match your design needs. Also, choose profiles that fit your LED strips properly.
3. Do LED aluminum profiles improve light performance? Yes, they enhance heat dissipation, which helps maintain the performance and lifespan of your LED strips.
4. Can I install LED aluminum profiles outdoors? Yes, but ensure the profiles are designed for outdoor use and are properly sealed to prevent damage from weather.
5. How can I install LED aluminum profiles without drilling holes? You can use adhesive backing for a no-drill installation, though it may not be as sturdy as screws or clips.
People Also Care About These Questions:
- How to choose the right LED aluminum profiles for your project?
- What are the benefits of using LED aluminum extrusions?
- How to properly install LED strip lights in aluminum channels?
- What are the most common mistakes when installing LED aluminum profiles?
- What is the difference between LED aluminum channels and profiles?
Productieproces LED-stripverlichting
De productie van LED-verlichting vereist hoge precisie, maar veel fabrikanten maken hun lampen op eenvoudige assemblagelijnen. We reguleren en controleren alle verwerkingsstappen in ons productiesysteem strikt. We hebben ook een volledige set apparatuur die is bestemd voor productie en kwaliteitscontrole. We hebben ervaren ingenieurs in dienst die ook fabriekssupervisors zijn om een strikte kwaliteitscontrole te garanderen voor elke afzonderlijke LED-striplamp.
We hopen dat dit bericht uw begrip van de LED-verlichtingsindustrie zal vergroten en u in staat zal stellen om de productlijn verder te ontwikkelen en te verkennen.

Stap 1. Led-strip licht materiaal IQC
Materialen zijn in de fabriek aangekomen, ongeacht PCB, led, ic, weerstand, aluminium profiel, kabels, QC-controle nodig. alle items moeten aan de eis voldoen. Kwaliteitscontrole is het eerste wat we moeten doen als alle materialen aankomen. We moeten ze inspecteren of ze gekwalificeerd zijn of niet --- er kunnen echter nog steeds enkele defecte producten zijn die het hele productieproces hebben doorlopen --- defecten in materialen, verwerking of verzending.

Stap 2. Controle van de LED-kleurtemperatuur
Nu, met alle nieuwe led-chips, moet u de kleurtemperatuur van de leds testen. De helderheid van dezelfde kleur is niet altijd hetzelfde. De Color Rendering Index is ook een onderwerp waar je de klant zeker van moet zijn.

Stap 3. LED droog proces
Meestal wordt dit proces gevolgd door het SMT-proces. LED moet worden gedroogd voordat het SMT verwerkt. De temperatuur van het drogen is niet minder dan 65℃ in 8 uur.
Stap 4. LED-striplicht SMT-proces
LED-striplicht SMT-proces wordt veel gebruikt in moderne verlichtingseenheden. Het grappige is dat SMT staat voor Surface Mount Technology, maar de technologie voor het produceren van de LED wordt niet alleen mount surface genoemd, maar omvat ook een snelle geautomatiseerde machine. Veel mensen begrijpen dit verkeerd.

Stap 5. LED-strip licht reflow soldeerproces
Reflow-soldeertechnologieproces na SMT, de componenten en PCB met behulp van de soldeerpasta. De PCB van de reflow-soldeermachine in een bepaalde temperatuur. De soldeerpasta in de vloeibare consistentie van gesmolten, en vervolgens gebonden aan verschillende componenten.

Stap 6. Inspectieproces LED-striplicht
we hebben 100% test om er zeker van te zijn dat er geen fysieke schade aan de producten is. De visuele inspectie zorgt ervoor dat er geen kleurverschuiving is in de LED's en of er componenten verkeerd zijn uitgelijnd in soldeerbruggen.


Stap 7. LED-striplicht soldeerproces
Sommige kleine PCB's met het nulhoek, loodvrije soldeerproces. Na inspectie gaat het LED-lint door een soldeermachine, die 0,5 m lint verbindt met 5 m lange strips.

Stap 8. LED-strip licht PCB schoon proces
Het PCB-oppervlak voor de LED-strip heeft een soldeerbout om schoon te maken. Het eerste wat je moet doen is nog steeds solderen. Soldeer het IC kan worden gebruikt om oxidatie tijdens het soldeerproces te voorkomen en snijd vervolgens de overtollige draad af in een ronde tandpasta-trommel, zoals oxidatie. Nadat dit allemaal is voltooid, kunnen we doorgaan met het schoonmaken.

Stap 9. LED-strip licht verouderingsproces
In feite heeft al het led-product een verlichtingstest van 8 uur nodig om ervoor te zorgen dat elke led in goede staat werkt. En we kunnen tijdens de verlichtingstest de kleuren meten, of de leds de juiste kleurtemperatuur hebben en of de driver goed werkt. Dit is dus erg belangrijk voor de fabrikant om ervoor te zorgen dat alle LED's in orde zijn.
Stap 10. LED-strip licht waterdicht proces
LED-strips zijn waterdicht en bovendien roestbestendig, waardoor ze geschikt zijn voor tal van toepassingen binnen en buiten het huis. Selectie van het waterdicht maken van ledstrips is een belangrijke stap in het productieproces. Er zijn hoogwaardige IP65 siliconen buis waterdicht en IP67 siliconen injectie waterdicht op de markt verkrijgbaar.

Stap 11. LED-striplicht voeg 3M-tapeproces toe
De 3M-tape op de achterkant van de strip biedt consumenten gemak en gemak bij het installeren van led-stripverlichting.
We gebruiken 3M 9080 voor alle niet-waterdichte en waterdichte strips, sommige klanten vragen om een andere 3M-lijm met betere kleverigheid of betere thermische geleidbaarheid, die ook beschikbaar is.

Stap 12. LED-strip licht eindinspectie
Nadat het gehele ledstrippakket onze verwerking heeft doorlopen, voert de afdeling kwaliteitscontrole van LED Starlight een laatste controle uit op onze producten. We zorgen er niet alleen voor dat ze dezelfde lichtkleur hebben en vrij zijn van gebreken, maar ook dat het uiterlijk goed genoeg is om aan de eisen van de klant te voldoen.
