Como instalar perfis de alumínio LED para luzes lineares?
LED aluminum profiles are essential components for installing LED strip lights. They help to protect your LED strips, improve heat dissipation, and enhance the overall aesthetic of your lighting setup. If you’re looking to install LED aluminum profiles in your home or office, follow this simple step-by-step guide. As a professional LED aluminum profile manufacturer from China, we’ll also share helpful tips and provide insight into choosing the right profiles for your LED strip lights.
Learn how to install LED aluminum profiles for linear lighting step by step. Discover how to protect your LED strips, improve heat dissipation, and create an elegant lighting effect with these easy-to-follow instructions from a leading China LED aluminum profile supplier.
Installing LED aluminum profiles is not only about improving the performance of your LED strip lights, but it also adds a sleek and modern touch to your lighting design. Whether you're lighting up a kitchen, office, or outdoor space, these profiles can be used for various applications. Let’s break down the installation process to make it simple for you.
What Are LED Aluminum Profiles?
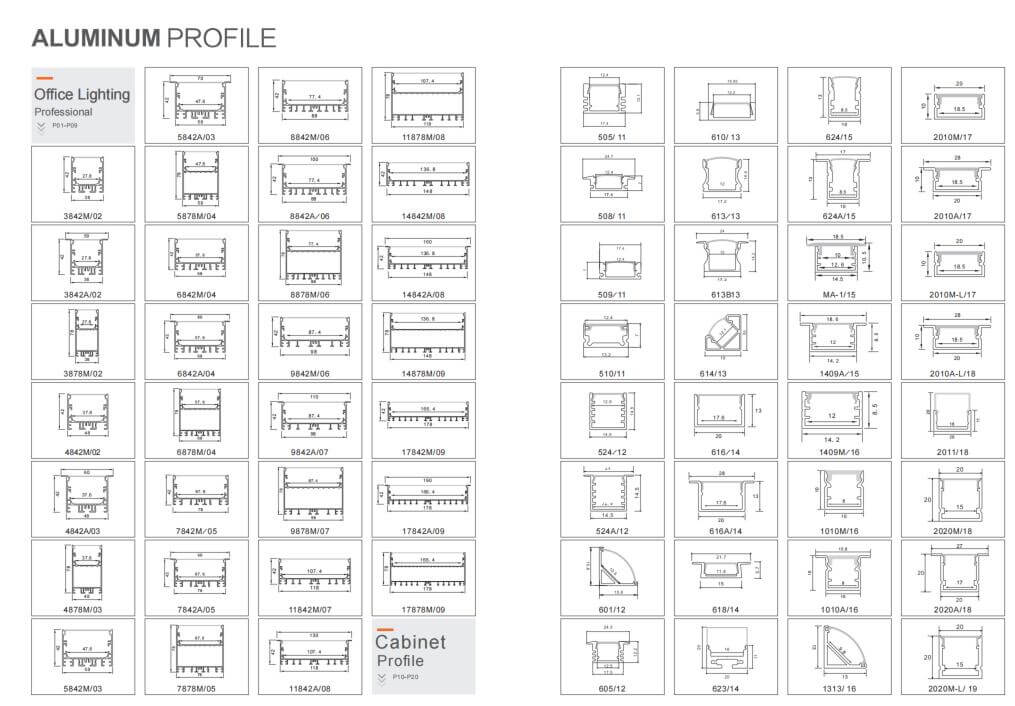
LED aluminum profiles are specially designed channels that house LED strip lights. These profiles are made from high-quality aluminum, which helps with heat dissipation, extending the lifespan of your LED strips. They are available in different sizes, shapes, and finishes to fit various lighting needs and interior designs. LED aluminum profiles, also known as LED aluminum extrusions or channels, are essential for creating professional-looking LED installations.
What Tools Do You Need to Install LED Aluminum Profiles?
To properly install LED aluminum profiles, you will need the following tools:
- Screwdriver (for securing the profiles)
- Measuring Tape (for precise measurements)
- Miter Saw (for cutting profiles to the desired length)
- Drill (for making mounting holes)
- Adhesive or Screws (depending on the mounting method)
- LED Strips (make sure they fit into the profile)
These tools will help you complete the installation process quickly and accurately.
How to Install LED Aluminum Profiles Step by Step?
Follow these simple steps to install your LED aluminum profiles:
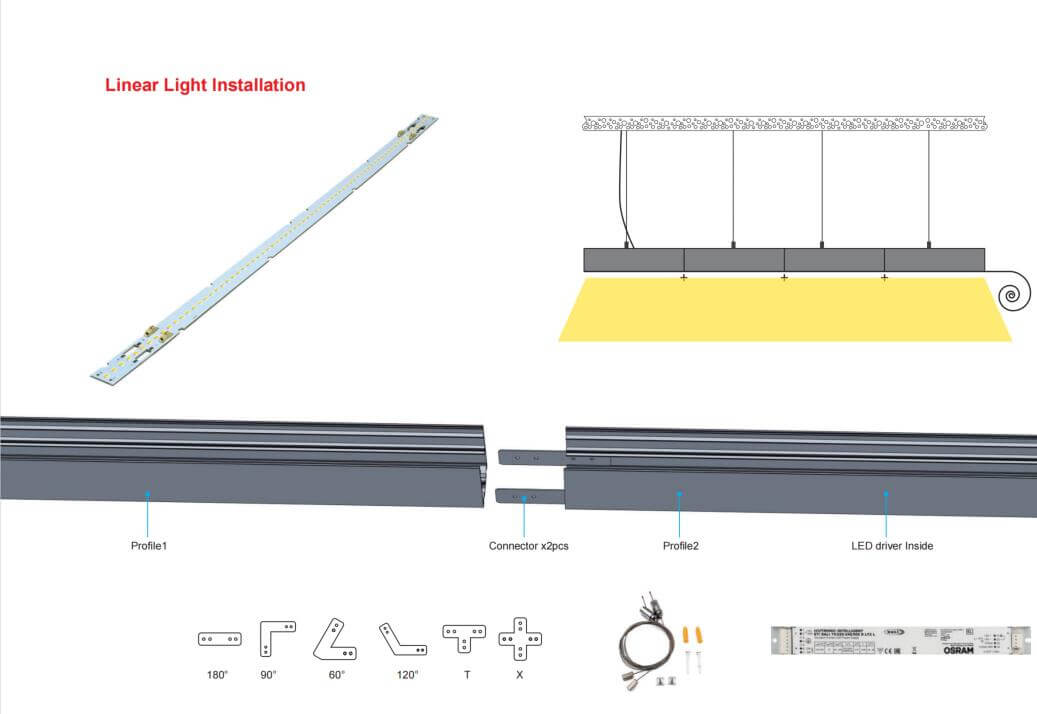
- Measure and Plan the Installation Area: Start by measuring the area where you want to install the LED aluminum profiles. Mark the points where the profiles will be placed, ensuring they are evenly spaced and aligned.
- Cut the Profiles to the Desired Length: Use a miter saw or hacksaw to cut the LED aluminum profiles to the required length. Be sure to wear safety glasses and gloves while cutting.
- Attach the Mounting Clips or Brackets: Depending on your profile design, you may need to use mounting clips or brackets to hold the profiles in place. Attach these to the wall or ceiling where the profiles will be installed.
- Insert the LED Strip Lights: Once the profile is securely mounted, carefully insert the LED strip lights into the aluminum channel. Make sure the LED strips are properly aligned and fit snugly within the profile.
- Connect the LED Strips to Power: Use the appropriate connectors or solder the wires to connect your LED strips to the power source. Ensure the voltage and power requirements are matched to avoid damage.
- Secure the Profile and Finish the Installation: Finally, secure the LED aluminum profiles to the mounting clips or brackets. If using adhesive, ensure it is properly bonded and holds the profile in place.
※ Claim 1: Ensure your LED aluminum profiles are compatible with the LED strips you're using to achieve optimal light output and cooling performance.
※ Claim 2: Make sure to check for any heat management issues when installing LED aluminum profiles in closed spaces to maintain the longevity of your LEDs.
What Are the Benefits of Using LED Aluminum Profiles?
LED aluminum profiles provide several advantages:
- Enhanced Heat Dissipation: The aluminum helps dissipate heat, preventing overheating and extending the lifespan of your LED strips.
- Improved Aesthetics: These profiles give your lighting setup a professional and sleek look, blending seamlessly with the interior design.
- Durability: LED aluminum channels are sturdy and protect your LED strips from physical damage and dust.
- Better Light Distribution: The profiles allow for uniform light diffusion, avoiding the “dots” effect often seen with bare LED strips.
How to Choose the Right LED Aluminum Profiles?
Choosing the right LED aluminum profile depends on several factors:
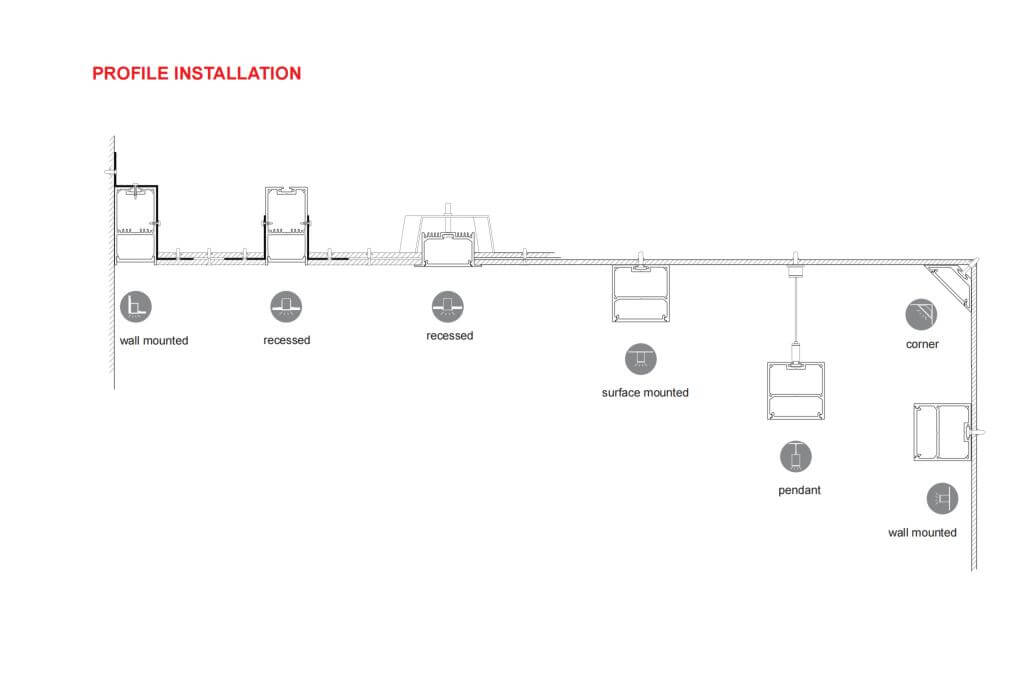
- Size and Shape: Consider the available space and the type of lighting effect you want to achieve.
- Mounting Type: Profiles can be surface-mounted, recessed, or suspended. Choose the one that suits your installation method.
- Finish: Opt for profiles with finishes that match the design of your room, such as anodized aluminum, matte black, or white.
※ Claim 1: As a leading China LED aluminum profile supplier, we offer a wide range of profiles to suit various installation needs and lighting effects.
※ Claim 2: You can find detailed information about our products and services on our website: Lightstec LED Aluminum Profiles.
Conclusão
Installing LED aluminum profiles is an excellent way to enhance the performance and appearance of your LED strip lights. By following these simple steps, you can achieve professional-looking lighting installations with ease. Whether you’re using LED strips for home decor or commercial spaces, these profiles will improve the longevity and efficiency of your lighting.
Q&A
1. Can I use any LED strip with aluminum profiles? Yes, as long as the LED strip fits into the profile, you can use any LED strip. Make sure the voltage and power ratings match.
2. How do I choose the right LED aluminum profile for my project? Consider the size, shape, and finish of the profiles to match your design needs. Also, choose profiles that fit your LED strips properly.
3. Do LED aluminum profiles improve light performance? Yes, they enhance heat dissipation, which helps maintain the performance and lifespan of your LED strips.
4. Can I install LED aluminum profiles outdoors? Yes, but ensure the profiles are designed for outdoor use and are properly sealed to prevent damage from weather.
5. How can I install LED aluminum profiles without drilling holes? You can use adhesive backing for a no-drill installation, though it may not be as sturdy as screws or clips.
People Also Care About These Questions:
- How to choose the right LED aluminum profiles for your project?
- What are the benefits of using LED aluminum extrusions?
- How to properly install LED strip lights in aluminum channels?
- What are the most common mistakes when installing LED aluminum profiles?
- What is the difference between LED aluminum channels and profiles?
Processo de fabricação de fitas LED
A produção de iluminação LED requer alta precisão, mas muitos fabricantes fabricam suas luzes em linhas de montagem básicas. Regulamos e monitoramos rigorosamente todas as etapas de processamento em nosso sistema de fabricação. Contamos também com um conjunto completo de equipamentos destinados à produção e controle de qualidade. Empregamos engenheiros experientes que também são supervisores de fábrica para garantir um controle de qualidade rigoroso para cada faixa de luz LED.
Esperamos que esta postagem aumente sua compreensão da indústria de iluminação LED e permita que você desenvolva e explore ainda mais a linha de produtos.

Etapa 1. Material de fita LED IQC
Os materiais chegaram na fábrica, não importa PCB, led, ic, resistência, perfil de alumínio, cabos, precisam de verificação de controle de qualidade. todos os itens precisam atender ao requisito. O Controle de Qualidade é a primeira coisa que devemos fazer quando todos os materiais chegam. Temos que inspecioná-los, sejam eles qualificados ou não --- no entanto, ainda pode haver alguns produtos defeituosos que passaram por todo o processo de produção --- defeitos de materiais, processamento ou envio.

Etapa 2. Verificação da temperatura da cor do LED
Agora, com todos os novos chips de LED, você precisa testar a temperatura de cor dos LEDs. O brilho da mesma cor nem sempre é o mesmo. O Índice de Renderização de Cores também é um tópico que você deve garantir ao cliente.

Etapa 3. Processo de secagem de LED
Normalmente, este processo será seguido pelo processo SMT. O LED precisa ser seco antes de processar o SMT. A temperatura de secagem não é inferior a 65°C em 8 horas.
Etapa 4. Processo SMT de fita LED
O processo SMT de fita LED é amplamente utilizado em unidades de iluminação modernas. O engraçado é que SMT significa Surface Mount Technology, mas a tecnologia de produção do LED não é apenas chamada de montagem em superfície, mas também inclui uma máquina automatizada de alta velocidade. Muitas pessoas estão entendendo mal isso.

Etapa 5. Processo de soldagem por refluxo de fita LED
Processo de tecnologia de soldagem por refluxo após SMT, os componentes e PCB usando a pasta de solda. O PCB da máquina de solda por refluxo em uma determinada temperatura. A pasta de solda na consistência líquida é derretida e depois ligada a diferentes componentes.

Etapa 6. Processo de inspeção de fita LED
temos 100% de teste para garantir que não haja danos físicos aos produtos. A inspeção visual garante que não há mudança de cor nos LEDs e se algum componente está desalinhado nas pontes de solda.


Etapa 7. Processo de soldagem de fita LED
Algumas placas de circuito impresso de tamanho pequeno com ângulo zero e processo de soldagem sem chumbo. Após a inspeção, a fita de LED passa por uma máquina de solda, que conecta fita de 0,5m a tiras de 5m de comprimento.

Etapa 8. Processo de limpeza de PCB de fita LED
A superfície do PCB da faixa de LED possui um ferro de solda para limpar. A primeira coisa a fazer ainda é soldar. Soldar o IC pode ser usado para evitar a oxidação durante o processo de soldagem e, em seguida, cortar o excesso de fio em um tambor redondo de pasta de dente, como oxidação. Depois que tudo isso estiver concluído, podemos continuar a limpá-lo.

Etapa 9. Processo de envelhecimento da fita LED
Na verdade, todo produto LED precisa de um teste de iluminação por 8 horas, para garantir que cada LED funcione em boas condições. E podemos medir as cores durante o teste de iluminação, se os LEDs estão na temperatura de cor correta e se o driver está funcionando bem. Portanto, isso é muito importante para o fabricante garantir que todos os LEDs estejam ok.
Etapa 10. Processo à prova d'água de fita LED
As fitas de LED são à prova d'água e também resistentes à ferrugem, o que as torna adequadas para diversas aplicações dentro e fora de casa. A seleção do processo de impermeabilização da fita LED é uma etapa importante no processo de fabricação. Existem tubos de silicone IP65 de alta qualidade à prova d'água e injeção de silicone IP67 à prova d'água disponíveis no mercado.

Etapa 11. Fita LED adicionar processo de fita 3M
A fita 3M na parte traseira da tira oferece aos consumidores comodidade e facilidade na instalação de fitas de LED.
Usamos 3M 9080 para todas as tiras não impermeáveis e impermeáveis, alguns clientes solicitam outro adesivo 3M com melhor aderência ou melhor condutividade térmica, que também está disponível.

Etapa 12. Inspeção final da fita LED
After the entire LED strip package has passed through our processing, LED Starlight's quality control department will perform a final check on our products. We not only make sure they have the same lighting color and are free from defects but also the appearance is good enough to meet the customers' requirements.
