How to Install LED Aluminum Profiles for Linear Lights?
LED aluminum profiles are essential components for installing LED strip lights. They help to protect your LED strips, improve heat dissipation, and enhance the overall aesthetic of your lighting setup. If you’re looking to install LED aluminum profiles in your home or office, follow this simple step-by-step guide. As a professional LED aluminum profile manufacturer from China, we’ll also share helpful tips and provide insight into choosing the right profiles for your LED strip lights.
Learn how to install LED aluminum profiles for linear lighting step by step. Discover how to protect your LED strips, improve heat dissipation, and create an elegant lighting effect with these easy-to-follow instructions from a leading China LED aluminum profile supplier.
Installing LED aluminum profiles is not only about improving the performance of your LED strip lights, but it also adds a sleek and modern touch to your lighting design. Whether you're lighting up a kitchen, office, or outdoor space, these profiles can be used for various applications. Let’s break down the installation process to make it simple for you.
What Are LED Aluminum Profiles?
LED aluminum profiles are specially designed channels that house LED strip lights. These profiles are made from high-quality aluminum, which helps with heat dissipation, extending the lifespan of your LED strips. They are available in different sizes, shapes, and finishes to fit various lighting needs and interior designs. LED aluminum profiles, also known as LED aluminum extrusions or channels, are essential for creating professional-looking LED installations.
What Tools Do You Need to Install LED Aluminum Profiles?
To properly install LED aluminum profiles, you will need the following tools:
- Screwdriver (for securing the profiles)
- Measuring Tape (for precise measurements)
- Miter Saw (for cutting profiles to the desired length)
- Drill (for making mounting holes)
- Adhesive or Screws (depending on the mounting method)
- LED Strips (make sure they fit into the profile)
These tools will help you complete the installation process quickly and accurately.
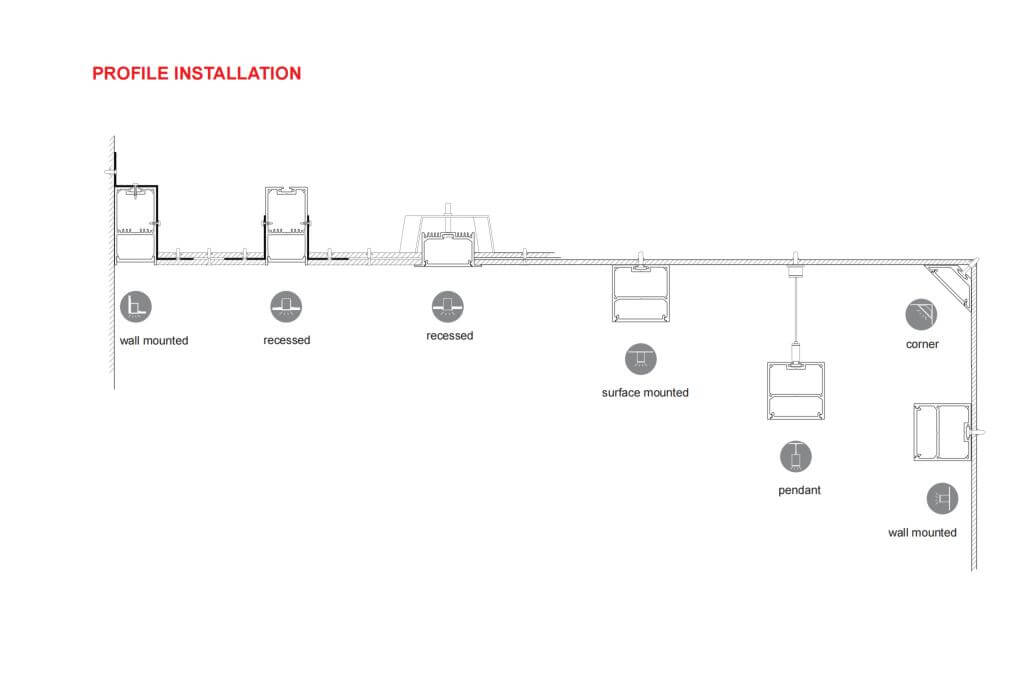
How to Install LED Aluminum Profiles Step by Step?
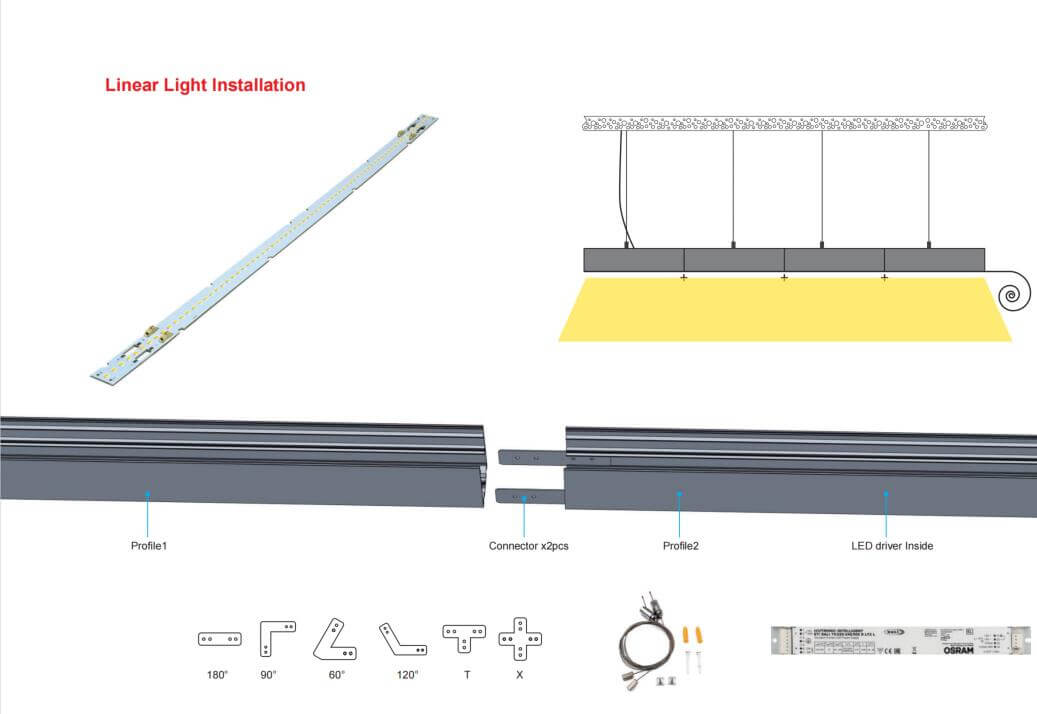
Follow these simple steps to install your LED aluminum profiles:
- Measure and Plan the Installation Area: Start by measuring the area where you want to install the LED aluminum profiles. Mark the points where the profiles will be placed, ensuring they are evenly spaced and aligned.
- Cut the Profiles to the Desired Length: Use a miter saw or hacksaw to cut the LED aluminum profiles to the required length. Be sure to wear safety glasses and gloves while cutting.
- Attach the Mounting Clips or Brackets: Depending on your profile design, you may need to use mounting clips or brackets to hold the profiles in place. Attach these to the wall or ceiling where the profiles will be installed.
- Insert the LED Strip Lights: Once the profile is securely mounted, carefully insert the LED strip lights into the aluminum channel. Make sure the LED strips are properly aligned and fit snugly within the profile.
- Connect the LED Strips to Power: Use the appropriate connectors or solder the wires to connect your LED strips to the power source. Ensure the voltage and power requirements are matched to avoid damage.
- Secure the Profile and Finish the Installation: Finally, secure the LED aluminum profiles to the mounting clips or brackets. If using adhesive, ensure it is properly bonded and holds the profile in place.
※ Claim 1: Ensure your LED aluminum profiles are compatible with the LED strips you're using to achieve optimal light output and cooling performance.
※ Claim 2: Make sure to check for any heat management issues when installing LED aluminum profiles in closed spaces to maintain the longevity of your LEDs.
What Are the Benefits of Using LED Aluminum Profiles?
LED aluminum profiles provide several advantages:
- Enhanced Heat Dissipation: The aluminum helps dissipate heat, preventing overheating and extending the lifespan of your LED strips.
- Improved Aesthetics: These profiles give your lighting setup a professional and sleek look, blending seamlessly with the interior design.
- Durability: LED aluminum channels are sturdy and protect your LED strips from physical damage and dust.
- Better Light Distribution: The profiles allow for uniform light diffusion, avoiding the “dots” effect often seen with bare LED strips.
How to Choose the Right LED Aluminum Profiles?
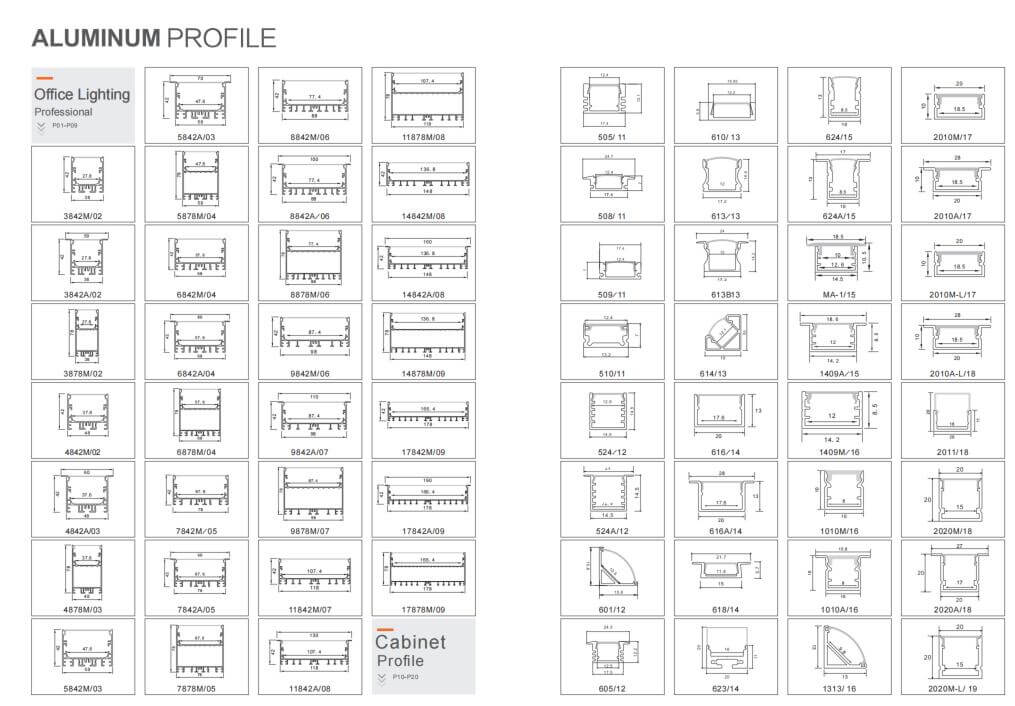
Choosing the right LED aluminum profile depends on several factors:
- Size and Shape: Consider the available space and the type of lighting effect you want to achieve.
- Mounting Type: Profiles can be surface-mounted, recessed, or suspended. Choose the one that suits your installation method.
- Finish: Opt for profiles with finishes that match the design of your room, such as anodized aluminum, matte black, or white.
※ Claim 1: As a leading China LED aluminum profile supplier, we offer a wide range of profiles to suit various installation needs and lighting effects.
※ Claim 2: You can find detailed information about our products and services on our website: Lightstec LED Aluminum Profiles.
Заключение
Installing LED aluminum profiles is an excellent way to enhance the performance and appearance of your LED strip lights. By following these simple steps, you can achieve professional-looking lighting installations with ease. Whether you’re using LED strips for home decor or commercial spaces, these profiles will improve the longevity and efficiency of your lighting.
Q&A
1. Can I use any LED strip with aluminum profiles? Yes, as long as the LED strip fits into the profile, you can use any LED strip. Make sure the voltage and power ratings match.
2. How do I choose the right LED aluminum profile for my project? Consider the size, shape, and finish of the profiles to match your design needs. Also, choose profiles that fit your LED strips properly.
3. Do LED aluminum profiles improve light performance? Yes, they enhance heat dissipation, which helps maintain the performance and lifespan of your LED strips.
4. Can I install LED aluminum profiles outdoors? Yes, but ensure the profiles are designed for outdoor use and are properly sealed to prevent damage from weather.
5. How can I install LED aluminum profiles without drilling holes? You can use adhesive backing for a no-drill installation, though it may not be as sturdy as screws or clips.
People Also Care About These Questions:
- How to choose the right LED aluminum profiles for your project?
- What are the benefits of using LED aluminum extrusions?
- How to properly install LED strip lights in aluminum channels?
- What are the most common mistakes when installing LED aluminum profiles?
- What is the difference between LED aluminum channels and profiles?
Процесс производства светодиодных лент
Производство светодиодного освещения требует высокой точности, но многие производители изготавливают свои светильники на простых сборочных линиях. Мы строго регламентируем и контролируем все этапы обработки в нашей производственной системе. У нас также есть полный комплект оборудования, предназначенного для производства и контроля качества. У нас работают опытные инженеры, которые также являются руководителями производства, чтобы обеспечить строгий контроль качества каждой отдельной светодиодной ленты.
Мы надеемся, что этот пост расширит ваше понимание индустрии светодиодного освещения и позволит вам продолжить разработку и изучение линейки продуктов.

Шаг 1. Материал светодиодной ленты IQC
Материалы прибыли на завод, независимо от того, печатная плата, светодиод, микросхема, сопротивление, алюминиевый профиль, кабели, требуется проверка контроля качества. все элементы должны соответствовать требованиям. Контроль качества — это первое, что мы должны сделать, когда все материалы прибудут. Мы должны проверить их, соответствуют ли они требованиям или нет --- однако все еще могут быть некоторые дефектные продукты, которые прошли через весь процесс производства --- дефекты материалов, обработки или доставки.

Шаг 2. Проверка цветовой температуры светодиодов
Теперь, со всеми новыми светодиодными чипами, вам нужно проверить цветовую температуру светодиодов. Яркость одного и того же цвета не всегда одинакова. Индекс цветопередачи также является темой, в которой вы должны убедиться, что клиент.

Шаг 3. Процесс сушки светодиодов
Обычно за этим процессом следует процесс SMT. Светодиод необходимо высушить перед обработкой SMT. Температура сушки не менее 65℃ за 8 часов.
Шаг 4. Процесс SMT светодиодной ленты
Процесс SMT для светодиодных лент широко используется в современных осветительных приборах. Что забавно, так это то, что SMT расшифровывается как технология поверхностного монтажа, но технология производства светодиодов не просто называется поверхностным монтажом, но также включает в себя высокоскоростное автоматизированное оборудование. Многие неправильно понимают это.

Шаг 5. Процесс пайки светодиодной ленты оплавлением
Процесс технологии пайки оплавлением после SMT, компонентов и печатной платы с использованием паяльной пасты. Печатная плата от машины для пайки оплавлением до определенной температуры. Паяльная паста в жидкой консистенции расплавляется, а затем приклеивается к различным компонентам.

Шаг 6. Процесс проверки светодиодной ленты
у нас есть 100% тест, чтобы убедиться, что продукты не повреждены. Визуальный осмотр позволяет убедиться в отсутствии смещения цвета светодиодов и в отсутствии смещения компонентов в паяных перемычках.


Шаг 7. Процесс пайки светодиодной ленты
Некоторые малогабаритные печатные платы с нулевым углом, процесс бессвинцовой пайки. После проверки светодиодная лента проходит через паяльную машину, которая соединяет 0,5-метровую ленту с полосками длиной 5 м.

Шаг 8. Процесс очистки печатной платы светодиодной ленты
Поверхность печатной платы для светодиодной ленты имеет паяльник для очистки. Первое, что нужно сделать, это все-таки припаять. Припой микросхемы можно использовать для предотвращения окисления в процессе пайки, а затем отрезать лишний выводной провод в круглый барабан зубной пасты, как окисление. После того, как все это будет сделано, мы можем продолжить его очистку.

Шаг 9. Процесс старения светодиодной ленты
На самом деле, весь светодиодный продукт нуждается в тестировании освещения в течение 8 часов, чтобы убедиться, что каждый светодиод работает в хорошем состоянии. И мы можем измерить цвета во время теста освещения, определить, имеют ли светодиоды правильную цветовую температуру и хорошо ли работает драйвер. Поэтому для производителя очень важно убедиться, что все светодиоды в порядке.
Шаг 10. Водонепроницаемость светодиодной ленты
Светодиодные ленты водонепроницаемы, а также устойчивы к ржавчине, что делает их пригодными для различных применений внутри и снаружи дома. Выбор процесса гидроизоляции светодиодной ленты является важным этапом производственного процесса. На рынке доступны высококачественные водонепроницаемые силиконовые трубки IP65 и водонепроницаемые силиконовые инъекционные IP67.

Шаг 11. Светодиодная лента с добавлением ленты 3M
Лента 3M на обратной стороне ленты обеспечивает потребителям удобство и простоту установки светодиодных лент.
Мы используем 3M 9080 для всех неводонепроницаемых и водонепроницаемых лент, некоторые клиенты запрашивают другой клей 3M с лучшей липкостью или лучшей теплопроводностью, который также доступен.

Шаг 12. Окончательная проверка светодиодной ленты
After the entire LED strip package has passed through our processing, LED Starlight's quality control department will perform a final check on our products. We not only make sure they have the same lighting color and are free from defects but also the appearance is good enough to meet the customers' requirements.
