How to Install LED Aluminum Profiles for Linear Lights?
LED aluminum profiles are essential components for installing LED strip lights. They help to protect your LED strips, improve heat dissipation, and enhance the overall aesthetic of your lighting setup. If you’re looking to install LED aluminum profiles in your home or office, follow this simple step-by-step guide. As a professional LED aluminum profile manufacturer from China, we’ll also share helpful tips and provide insight into choosing the right profiles for your LED strip lights.
Learn how to install LED aluminum profiles for linear lighting step by step. Discover how to protect your LED strips, improve heat dissipation, and create an elegant lighting effect with these easy-to-follow instructions from a leading China LED aluminum profile supplier.
Installing LED aluminum profiles is not only about improving the performance of your LED strip lights, but it also adds a sleek and modern touch to your lighting design. Whether you're lighting up a kitchen, office, or outdoor space, these profiles can be used for various applications. Let’s break down the installation process to make it simple for you.
What Are LED Aluminum Profiles?
LED aluminum profiles are specially designed channels that house LED strip lights. These profiles are made from high-quality aluminum, which helps with heat dissipation, extending the lifespan of your LED strips. They are available in different sizes, shapes, and finishes to fit various lighting needs and interior designs. LED aluminum profiles, also known as LED aluminum extrusions or channels, are essential for creating professional-looking LED installations.
What Tools Do You Need to Install LED Aluminum Profiles?
To properly install LED aluminum profiles, you will need the following tools:
- Screwdriver (for securing the profiles)
- Measuring Tape (for precise measurements)
- Miter Saw (for cutting profiles to the desired length)
- Drill (for making mounting holes)
- Adhesive or Screws (depending on the mounting method)
- LED Strips (make sure they fit into the profile)
These tools will help you complete the installation process quickly and accurately.
How to Install LED Aluminum Profiles Step by Step?
Follow these simple steps to install your LED aluminum profiles:
- Measure and Plan the Installation Area: Start by measuring the area where you want to install the LED aluminum profiles. Mark the points where the profiles will be placed, ensuring they are evenly spaced and aligned.
- Cut the Profiles to the Desired Length: Use a miter saw or hacksaw to cut the LED aluminum profiles to the required length. Be sure to wear safety glasses and gloves while cutting.
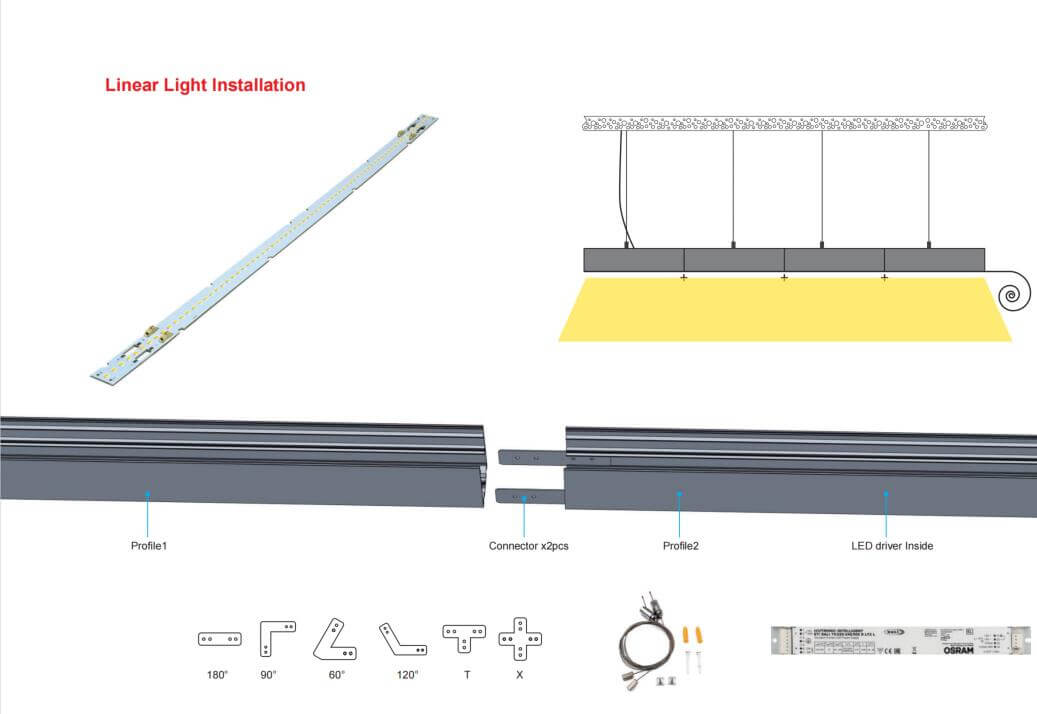
- Attach the Mounting Clips or Brackets: Depending on your profile design, you may need to use mounting clips or brackets to hold the profiles in place. Attach these to the wall or ceiling where the profiles will be installed.
- Insert the LED Strip Lights: Once the profile is securely mounted, carefully insert the LED strip lights into the aluminum channel. Make sure the LED strips are properly aligned and fit snugly within the profile.
- Connect the LED Strips to Power: Use the appropriate connectors or solder the wires to connect your LED strips to the power source. Ensure the voltage and power requirements are matched to avoid damage.
- Secure the Profile and Finish the Installation: Finally, secure the LED aluminum profiles to the mounting clips or brackets. If using adhesive, ensure it is properly bonded and holds the profile in place.
※ Claim 1: Ensure your LED aluminum profiles are compatible with the LED strips you're using to achieve optimal light output and cooling performance.
※ Claim 2: Make sure to check for any heat management issues when installing LED aluminum profiles in closed spaces to maintain the longevity of your LEDs.
What Are the Benefits of Using LED Aluminum Profiles?
LED aluminum profiles provide several advantages:
- Enhanced Heat Dissipation: The aluminum helps dissipate heat, preventing overheating and extending the lifespan of your LED strips.
- Improved Aesthetics: These profiles give your lighting setup a professional and sleek look, blending seamlessly with the interior design.
- Durability: LED aluminum channels are sturdy and protect your LED strips from physical damage and dust.
- Better Light Distribution: The profiles allow for uniform light diffusion, avoiding the “dots” effect often seen with bare LED strips.
How to Choose the Right LED Aluminum Profiles?
Choosing the right LED aluminum profile depends on several factors:
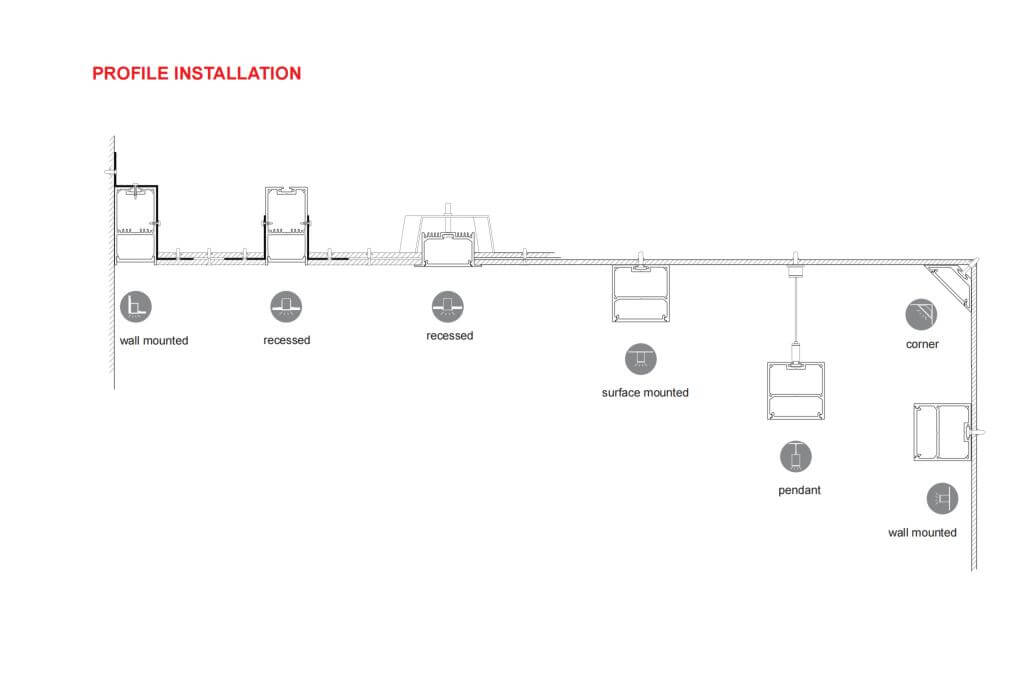
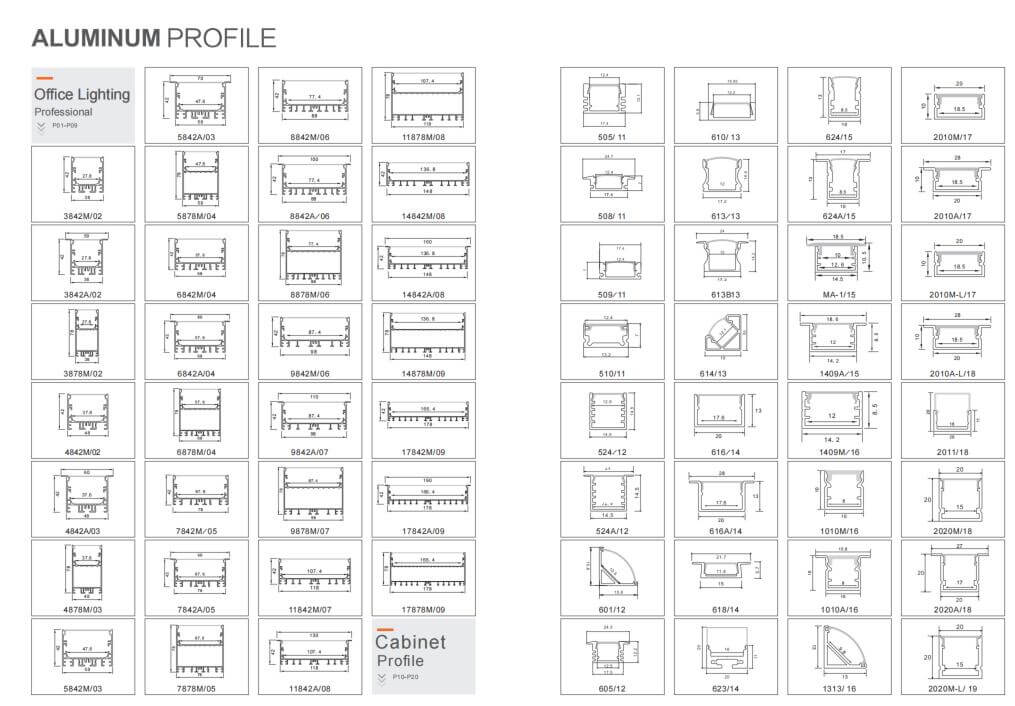
- Size and Shape: Consider the available space and the type of lighting effect you want to achieve.
- Mounting Type: Profiles can be surface-mounted, recessed, or suspended. Choose the one that suits your installation method.
- Finish: Opt for profiles with finishes that match the design of your room, such as anodized aluminum, matte black, or white.
※ Claim 1: As a leading China LED aluminum profile supplier, we offer a wide range of profiles to suit various installation needs and lighting effects.
※ Claim 2: You can find detailed information about our products and services on our website: Lightstec LED Aluminum Profiles.
Slutsats
Installing LED aluminum profiles is an excellent way to enhance the performance and appearance of your LED strip lights. By following these simple steps, you can achieve professional-looking lighting installations with ease. Whether you’re using LED strips for home decor or commercial spaces, these profiles will improve the longevity and efficiency of your lighting.
Q&A
1. Can I use any LED strip with aluminum profiles? Yes, as long as the LED strip fits into the profile, you can use any LED strip. Make sure the voltage and power ratings match.
2. How do I choose the right LED aluminum profile for my project? Consider the size, shape, and finish of the profiles to match your design needs. Also, choose profiles that fit your LED strips properly.
3. Do LED aluminum profiles improve light performance? Yes, they enhance heat dissipation, which helps maintain the performance and lifespan of your LED strips.
4. Can I install LED aluminum profiles outdoors? Yes, but ensure the profiles are designed for outdoor use and are properly sealed to prevent damage from weather.
5. How can I install LED aluminum profiles without drilling holes? You can use adhesive backing for a no-drill installation, though it may not be as sturdy as screws or clips.
People Also Care About These Questions:
- How to choose the right LED aluminum profiles for your project?
- What are the benefits of using LED aluminum extrusions?
- How to properly install LED strip lights in aluminum channels?
- What are the most common mistakes when installing LED aluminum profiles?
- What is the difference between LED aluminum channels and profiles?
LED Strip Lights tillverkningsprocess
LED-belysningsproduktion kräver hög precision, men många tillverkare tillverkar sina lampor på grundläggande löpande band. Vi reglerar och övervakar strikt alla bearbetningssteg i vårt tillverkningssystem. Vi har också en komplett uppsättning utrustning avsedd för produktion och kvalitetskontroll. Vi anställer erfarna ingenjörer som också är fabriksövervakare för att säkerställa strikt kvalitetskontroll för varje enskild LED-lampa.
Vi hoppas att detta inlägg kommer att öka din förståelse för LED-belysningsbranschen och låta dig utveckla och utforska produktlinjen ytterligare.

Steg 1. LED strip ljus material IQC
Material anlände till fabriken, oavsett PCB, led, ic, motstånd, aluminiumprofil, kablar, behöver QC-kontroll. alla föremål måste uppfylla kravet. Kvalitetskontroll är det första vi måste göra när allt material kommer fram. Vi måste inspektera dem om de är kvalificerade eller inte --- dock kan det fortfarande finnas några defekta produkter som har gått igenom hela produktionsprocessen --- defekter i material, bearbetning eller frakt.

Steg 2. Kontroll av LED-färgtemperatur
Nu, med alla nya LED-chips, måste du testa lysdiodernas färgtemperatur. Ljusstyrkan i samma färg är inte alltid densamma. Färgåtergivningsindex är också ett ämne som du måste se till kunden.

Steg 3. LED-torrprocess
Vanligtvis kommer denna process att följas av SMT-processen. LED måste torkas innan den bearbetar SMT. Temperaturen på torkningen är inte mindre än 65 ℃ på 8 timmar.
Steg 4. LED-remsljus SMT-process
LED-remsljus SMT-process används ofta i moderna belysningsenheter. Det som är roligt är att SMT står för Surface Mount Technology, men tekniken för hur man producerar LED kallas inte bara för monteringsyta utan inkluderar även en höghastighetsautomatiserad maskin. Många missförstår detta.

Steg 5. LED-remsljus reflow lödprocess
Reflow lödningsteknikprocess efter SMT, komponenterna och PCB med hjälp av lödpastan. PCB från reflow lödmaskinen till en viss temperatur. Lödet klistra in i den flytande konsistensen av smält, och sedan bunden till olika komponenter.

Steg 6. Inspektionsprocess för LED-remsor
vi har 100% test för att säkerställa att det inte finns några fysiska skador på produkterna. Den visuella inspektionen säkerställer att det inte finns någon färgförskjutning i lysdioderna och om några komponenter är felinriktade i lödbryggor.


Steg 7. LED-remsljuslödningsprocess
Några små PCB med noll vinkel, blyfri lödprocess. Efter inspektion passerar LED-bandet genom en lödmaskin, som förbinder 0,5 m band till 5 m långa remsor.

Steg 8. LED strip ljus PCB ren process
PCB-ytan för LED-remsan har en lödkolv att rengöra. Det första du ska göra är fortfarande att löda. Löd IC:en kan användas för att förhindra oxidation under lödningsprocessen, och skär sedan av överflödig ledningstråd till en rund tandkrämstrumma, som oxidation. När allt detta är klart kan vi fortsätta att rengöra det.

Steg 9. Åldringsprocess för LED-remsljus
Faktum är att alla LED-produkter behöver ett belysningstest i 8 timmar för att säkerställa att varje LED-lampa fungerar i gott skick. Och vi kan mäta färgerna under ljustestet, och om lysdioderna har rätt färgtemperatur och om föraren fungerar bra. Så detta är mycket viktigt för tillverkaren att se till att alla lysdioder är ok.
Steg 10. LED strip ljus vattentät process
LED-listlampor är vattentäta och även rostbeständiga, vilket gör dem lämpliga för en rad applikationer i och utanför huset. Val av vattentätningsprocess för LED-remsor är ett viktigt steg i tillverkningsprocessen. Det finns högkvalitativa IP65 silikonrör vattentäta och IP67 silikoninjektionsvattentäta tillgängliga på marknaden.

Steg 11. LED-remsljus lägg till 3M tejpprocess
3M-tejpen på remsans baksida ger konsumenterna bekvämlighet och enkelhet att installera LED-belysning.
Vi använder 3M 9080 för alla icke-vattentäta och vattentäta remsor, vissa kunder efterfrågar annat 3M-lim med bättre klibbighet eller bättre värmeledningsförmåga, det finns också.

Steg 12. Slutinspektion av LED-remsljus
Efter att hela LED-remspaketet har gått igenom vår bearbetning kommer LED Starlights kvalitetskontrollavdelning att utföra en sista kontroll av våra produkter. Vi ser inte bara till att de har samma ljusfärg och är fria från defekter utan även utseendet är tillräckligt bra för att möta kundernas krav.
