Làm thế nào để cài đặt cấu hình nhôm LED cho đèn tuyến tính?
LED aluminum profiles are essential components for installing LED strip lights. They help to protect your LED strips, improve heat dissipation, and enhance the overall aesthetic of your lighting setup. If you’re looking to install LED aluminum profiles in your home or office, follow this simple step-by-step guide. As a professional LED aluminum profile manufacturer from China, we’ll also share helpful tips and provide insight into choosing the right profiles for your LED strip lights.
Learn how to install LED aluminum profiles for linear lighting step by step. Discover how to protect your LED strips, improve heat dissipation, and create an elegant lighting effect with these easy-to-follow instructions from a leading China LED aluminum profile supplier.
Installing LED aluminum profiles is not only about improving the performance of your LED strip lights, but it also adds a sleek and modern touch to your lighting design. Whether you're lighting up a kitchen, office, or outdoor space, these profiles can be used for various applications. Let’s break down the installation process to make it simple for you.
What Are LED Aluminum Profiles?
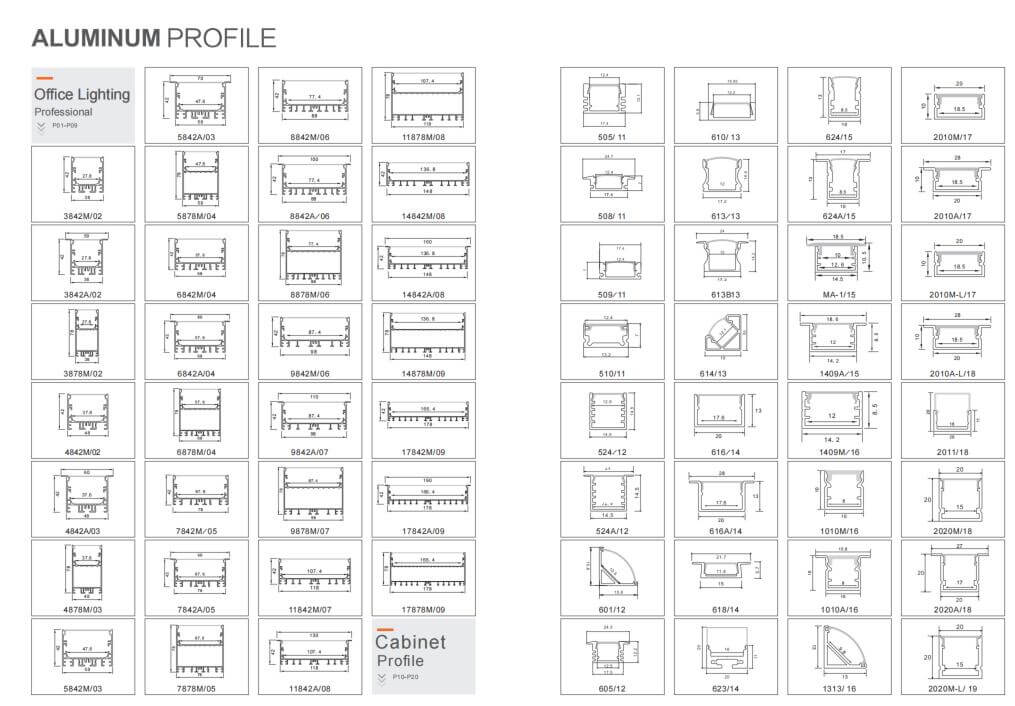
LED aluminum profiles are specially designed channels that house LED strip lights. These profiles are made from high-quality aluminum, which helps with heat dissipation, extending the lifespan of your LED strips. They are available in different sizes, shapes, and finishes to fit various lighting needs and interior designs. LED aluminum profiles, also known as LED aluminum extrusions or channels, are essential for creating professional-looking LED installations.
What Tools Do You Need to Install LED Aluminum Profiles?
To properly install LED aluminum profiles, you will need the following tools:
- Screwdriver (for securing the profiles)
- Measuring Tape (for precise measurements)
- Miter Saw (for cutting profiles to the desired length)
- Drill (for making mounting holes)
- Adhesive or Screws (depending on the mounting method)
- LED Strips (make sure they fit into the profile)
These tools will help you complete the installation process quickly and accurately.
How to Install LED Aluminum Profiles Step by Step?
Follow these simple steps to install your LED aluminum profiles:
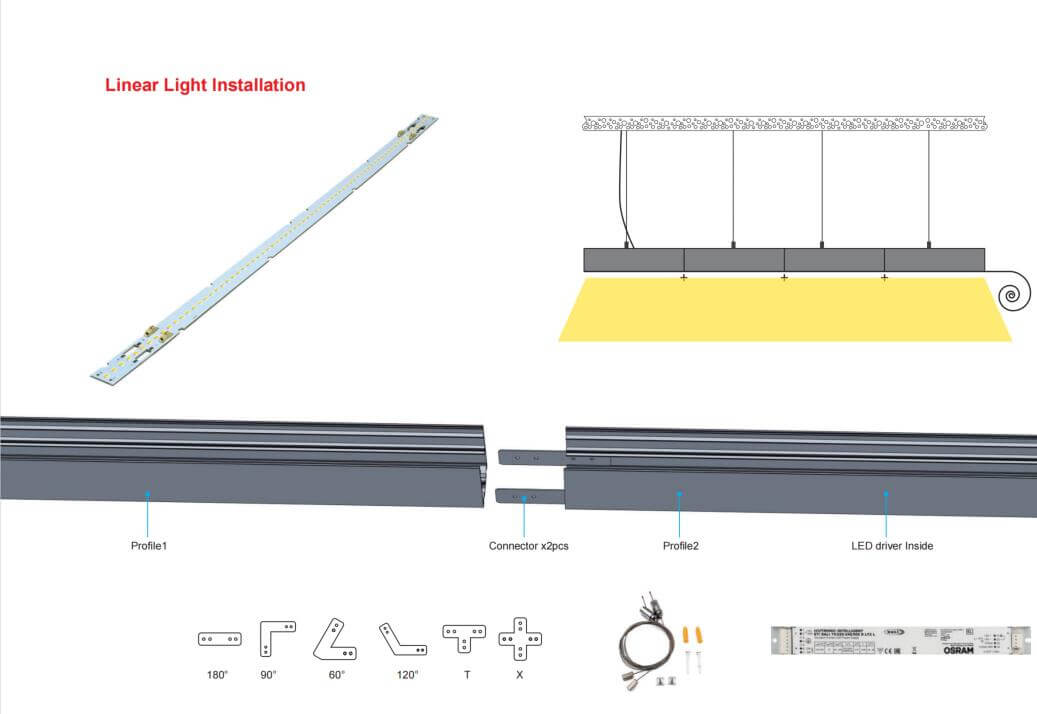
- Measure and Plan the Installation Area: Start by measuring the area where you want to install the LED aluminum profiles. Mark the points where the profiles will be placed, ensuring they are evenly spaced and aligned.
- Cut the Profiles to the Desired Length: Use a miter saw or hacksaw to cut the LED aluminum profiles to the required length. Be sure to wear safety glasses and gloves while cutting.
- Attach the Mounting Clips or Brackets: Depending on your profile design, you may need to use mounting clips or brackets to hold the profiles in place. Attach these to the wall or ceiling where the profiles will be installed.
- Insert the LED Strip Lights: Once the profile is securely mounted, carefully insert the LED strip lights into the aluminum channel. Make sure the LED strips are properly aligned and fit snugly within the profile.
- Connect the LED Strips to Power: Use the appropriate connectors or solder the wires to connect your LED strips to the power source. Ensure the voltage and power requirements are matched to avoid damage.
- Secure the Profile and Finish the Installation: Finally, secure the LED aluminum profiles to the mounting clips or brackets. If using adhesive, ensure it is properly bonded and holds the profile in place.
※ Claim 1: Ensure your LED aluminum profiles are compatible with the LED strips you're using to achieve optimal light output and cooling performance.
※ Claim 2: Make sure to check for any heat management issues when installing LED aluminum profiles in closed spaces to maintain the longevity of your LEDs.
What Are the Benefits of Using LED Aluminum Profiles?
LED aluminum profiles provide several advantages:
- Enhanced Heat Dissipation: The aluminum helps dissipate heat, preventing overheating and extending the lifespan of your LED strips.
- Improved Aesthetics: These profiles give your lighting setup a professional and sleek look, blending seamlessly with the interior design.
- Durability: LED aluminum channels are sturdy and protect your LED strips from physical damage and dust.
- Better Light Distribution: The profiles allow for uniform light diffusion, avoiding the “dots” effect often seen with bare LED strips.
How to Choose the Right LED Aluminum Profiles?
Choosing the right LED aluminum profile depends on several factors:
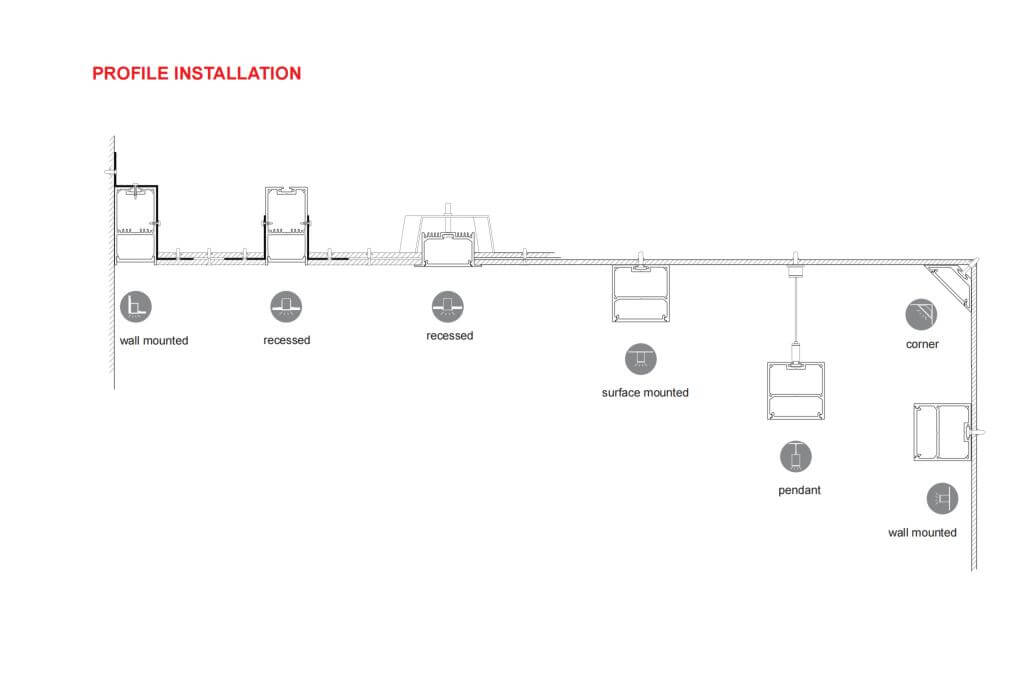
- Size and Shape: Consider the available space and the type of lighting effect you want to achieve.
- Mounting Type: Profiles can be surface-mounted, recessed, or suspended. Choose the one that suits your installation method.
- Finish: Opt for profiles with finishes that match the design of your room, such as anodized aluminum, matte black, or white.
※ Claim 1: As a leading China LED aluminum profile supplier, we offer a wide range of profiles to suit various installation needs and lighting effects.
※ Claim 2: You can find detailed information about our products and services on our website: Lightstec LED Aluminum Profiles.
Phần kết luận
Installing LED aluminum profiles is an excellent way to enhance the performance and appearance of your LED strip lights. By following these simple steps, you can achieve professional-looking lighting installations with ease. Whether you’re using LED strips for home decor or commercial spaces, these profiles will improve the longevity and efficiency of your lighting.
Q&A
1. Can I use any LED strip with aluminum profiles? Yes, as long as the LED strip fits into the profile, you can use any LED strip. Make sure the voltage and power ratings match.
2. How do I choose the right LED aluminum profile for my project? Consider the size, shape, and finish of the profiles to match your design needs. Also, choose profiles that fit your LED strips properly.
3. Do LED aluminum profiles improve light performance? Yes, they enhance heat dissipation, which helps maintain the performance and lifespan of your LED strips.
4. Can I install LED aluminum profiles outdoors? Yes, but ensure the profiles are designed for outdoor use and are properly sealed to prevent damage from weather.
5. How can I install LED aluminum profiles without drilling holes? You can use adhesive backing for a no-drill installation, though it may not be as sturdy as screws or clips.
People Also Care About These Questions:
- How to choose the right LED aluminum profiles for your project?
- What are the benefits of using LED aluminum extrusions?
- How to properly install LED strip lights in aluminum channels?
- What are the most common mistakes when installing LED aluminum profiles?
- What is the difference between LED aluminum channels and profiles?
Quy trình sản xuất đèn LED dải
Sản xuất đèn LED đòi hỏi độ chính xác cao, nhưng nhiều nhà sản xuất sản xuất đèn của họ trên dây chuyền lắp ráp cơ bản. Chúng tôi quy định và giám sát nghiêm ngặt tất cả các bước xử lý trong hệ thống sản xuất của mình. Chúng tôi cũng có đầy đủ các thiết bị được chỉ định để sản xuất và kiểm tra chất lượng. Chúng tôi tuyển dụng các kỹ sư giàu kinh nghiệm, đồng thời cũng là giám sát nhà máy để đảm bảo kiểm soát chất lượng nghiêm ngặt cho từng dải đèn LED.
Chúng tôi hy vọng rằng bài đăng này sẽ nâng cao hiểu biết của bạn về ngành công nghiệp chiếu sáng LED và cho phép bạn phát triển và khám phá thêm về dòng sản phẩm.

Bước 1. Vật liệu chiếu sáng dải LED IQC
Nguyên vật liệu về đến nhà máy, không cần biết PCB, led, ic, điện trở, nhôm định hình, cáp, cần QC kiểm tra. tất cả các mục cần phải đáp ứng yêu cầu. Kiểm soát chất lượng là điều đầu tiên chúng tôi phải làm khi tất cả các vật liệu đến nơi. Chúng tôi phải kiểm tra xem chúng có đủ tiêu chuẩn hay không --- tuy nhiên, vẫn có thể có một số sản phẩm bị lỗi đã trải qua toàn bộ quá trình sản xuất --- lỗi trong nguyên liệu, chế biến hoặc vận chuyển.

Bước 2. Kiểm tra nhiệt độ màu của đèn LED
Bây giờ, với tất cả các chip led mới, bạn cần phải kiểm tra nhiệt độ màu của đèn LED. Độ sáng của cùng một màu không phải lúc nào cũng giống nhau. Chỉ số hoàn màu cũng là một chủ đề mà bạn phải đảm bảo với khách hàng.

Bước 3. Quy trình khô đèn LED
Thông thường, quy trình này sẽ được theo sau bởi quy trình SMT. LED cần được làm khô trước khi xử lý SMT. Nhiệt độ sấy không nhỏ hơn 65 ℃ trong 8 giờ.
Bước 4. Quy trình SMT ánh sáng dải LED
Quy trình chiếu sáng dải LED SMT được sử dụng rộng rãi trong các đơn vị chiếu sáng hiện đại. Điều buồn cười là SMT là viết tắt của Surface Mount Technology, nhưng công nghệ về cách sản xuất đèn LED không chỉ được gọi là bề mặt gắn kết mà còn bao gồm một máy tự động tốc độ cao. Nhiều người đang hiểu sai điều này.

Bước 5. Quy trình hàn tái phát sáng dải đèn LED
Quy trình công nghệ hàn lại sau SMT, các thành phần và PCB bằng cách sử dụng keo hàn. PCB từ máy hàn trở lại nhiệt độ nhất định. Keo hàn thành chất lỏng nhất quán tan chảy, và sau đó liên kết với các thành phần khác nhau.

Bước 6. Quy trình kiểm tra dải đèn LED
chúng tôi có 100% kiểm tra để đảm bảo rằng không có thiệt hại vật chất cho các sản phẩm. Việc kiểm tra bằng mắt đảm bảo rằng không có sự thay đổi màu sắc trong đèn LED và nếu có bất kỳ thành phần nào bị lệch trong các cầu hàn.


Bước 7. Quy trình hàn đèn dải LED
Một số PCB kích thước nhỏ với góc bằng không, quá trình hàn không chì. Sau khi kiểm tra, dải băng LED đi qua một máy hàn, máy hàn này kết nối dải băng 0,5m với dải dài 5m.

Bước 8. Quy trình làm sạch PCB bằng dải đèn LED
Bề mặt PCB cho dải LED có mỏ hàn để làm sạch. Việc đầu tiên cần làm vẫn là hàn. Hàn IC có thể được sử dụng để ngăn chặn quá trình oxy hóa trong quá trình hàn, và sau đó cắt dây chì thừa thành trống kem đánh răng tròn, giống như quá trình oxy hóa. Sau khi tất cả những điều này được hoàn thành, chúng ta có thể tiếp tục làm sạch nó.

Bước 9. Quy trình lão hóa ánh sáng dải LED
Trên thực tế, tất cả các sản phẩm đèn LED đều cần kiểm tra ánh sáng trong 8 giờ để đảm bảo mỗi đèn LED chạy trong tình trạng tốt. Và chúng tôi có thể đo màu sắc trong quá trình kiểm tra ánh sáng và đèn LED có ở nhiệt độ màu phù hợp hay không và trình điều khiển có hoạt động tốt hay không. Vì vậy, điều này rất quan trọng đối với nhà sản xuất để đảm bảo mọi đèn LED đều ổn.
Bước 10. Quy trình chống thấm nước bằng dải đèn LED
Đèn LED dây có khả năng chống thấm nước và cũng có khả năng chống rỉ sét, giúp chúng phù hợp với một số ứng dụng trong và ngoài nhà. Lựa chọn quy trình chống thấm đèn LED dải sáng là một bước quan trọng trong quá trình sản xuất. Hiện có chất lượng cao IP65 ống silicon chống thấm nước và IP67 chống thấm nước phun silicon có sẵn trên thị trường.

Bước 11. Ánh sáng dải LED thêm quy trình băng 3M
Băng 3M ở mặt sau của dải cung cấp cho người tiêu dùng sự thuận tiện và dễ dàng trong việc lắp đặt đèn chiếu sáng dải LED.
Chúng tôi sử dụng 3M 9080 cho tất cả các dải không chống thấm và không thấm nước, một số khách hàng yêu cầu loại keo 3M khác có độ dính tốt hơn hoặc dẫn nhiệt tốt hơn, loại keo này cũng có sẵn.

Bước 12. Kiểm tra lần cuối ánh sáng dải LED
Sau khi toàn bộ gói dải đèn LED đã qua quá trình xử lý của chúng tôi, bộ phận kiểm tra chất lượng của LED Starlight sẽ thực hiện kiểm tra lần cuối đối với sản phẩm của chúng tôi. Chúng tôi không chỉ đảm bảo rằng chúng có màu ánh sáng giống nhau và không bị lỗi mà còn phải đảm bảo hình thức bên ngoài đủ đẹp để đáp ứng yêu cầu của khách hàng.