
LED strip lights have become increasingly popular due to their versatility and energy efficiency. Whether you want to add ambiance to your living space or highlight specific areas, installing LED strip lights can transform any room. In this guide, we will walk you through the tools required, and the installation process, and address frequently asked questions to ensure a successful installation. KayTai — a professional LED strip manufacturer — also shares guides on cutting and connecting strips şi choosing a power supply.
Tools Required
1. LED Strip Lights
Choose the appropriate length and color temperature for your desired application.
2. Power Supply
Ensure it matches the voltage and wattage requirements of your LED strip lights.
3. Connectors
Depending on the layout, you may need connectors to join multiple LED strips together.
4. Mounting Clips / Tape
These will be used to secure the LED strip lights in place.
5. Wire Cutters & Strippers
Essential for cutting and preparing wires.
6. Screwdriver / Drill
Required for attaching mounting clips or brackets.
Installation Process
Planning
Determine the desired location for your LED strip lights. Measure the length required and cut the LED strip lights accordingly. Consider any power source limitations and plan the route for the power supply. For help, see our ghid de tăiere.
Power Supply Connection
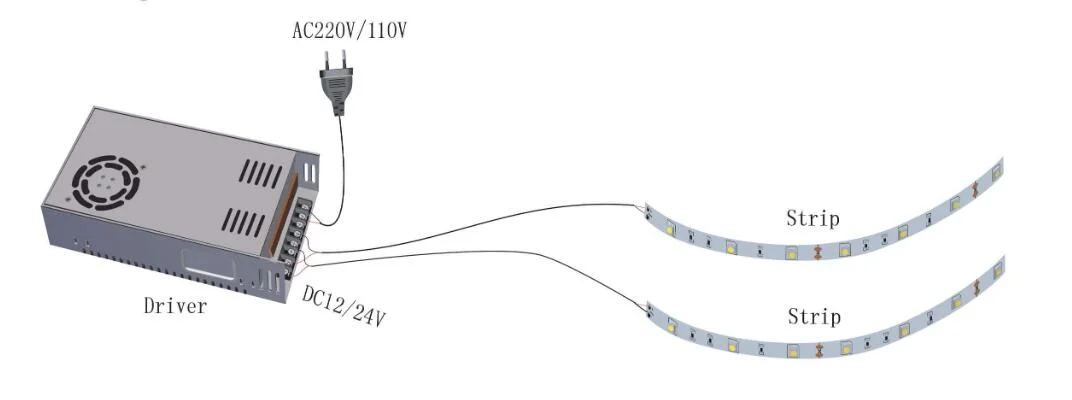
Ensure the power is turned off before making any connections. Connect the positive (+) and negative (-) wires from the power supply to the corresponding terminals on the LED strip lights. Use connectors or solder the wires together, ensuring a secure connection. Insulate the connections with electrical tape or heat shrink tubing. Read our power supply connection guide.
Mounting the LED Strip Lights
Clean the surface where you plan to mount the LED strip lights. If using mounting clips, attach them to the desired location, ensuring they are evenly spaced. If using adhesive tape, remove the protective backing and carefully press the LED strip lights onto the surface.
Testing and Finalizing
Turn on the power supply and check if the LED strip lights are functioning correctly. Adjust the positioning or make any necessary modifications. Secure any loose cables or wires using cable clips or zip ties. Enjoy your newly installed LED strip lights!
FAQs
▶Can I cut the LED strip lights to a specific length?
Yes, most LED strip lights can be cut at designated intervals. However, it is important to follow the manufacturer’s instructions to avoid damaging the lights.
▶Can I connect multiple LED strip lights together?
Yes, you can connect multiple LED strip lights by using connectors or soldering the wires together. Ensure the voltage and wattage requirements are not exceeded. See our connecting multiple strips guide.
▶Can LED strip lights be used outdoors?
Yes, there are waterproof LED strip lights available specifically designed for outdoor use. Ensure you choose the appropriate type for your application.
▶Can I dim LED strip lights?
Yes, many LED strip lights are dimmable. However, you will need a compatible dimmer switch or controller to adjust the brightness.
▶How do I clean LED strip lights?
To clean LED strip lights, gently wipe the surface with a soft, lint-free cloth. Avoid using harsh chemicals or abrasive materials that may damage the lights.
Concluzie

Installing LED strip lights can enhance the ambiance and functionality of any space. By following the steps outlined in this guide and using the appropriate tools, you can successfully install LED strip lights and enjoy their benefits. Remember to always prioritize safety and consult the manufacturer’s instructions for specific guidance.
Ready to Install LED Strip Lights?
Get the right strips, power supply and connectors for your project — our team will help you spec everything with factory-direct pricing.
Contactați KayTai