How to Install LED Aluminum Profiles for Linear Lights?
LED aluminum profiles are essential components for installing LED strip lights. They help to protect your LED strips, improve heat dissipation, and enhance the overall aesthetic of your lighting setup. If you’re looking to install LED aluminum profiles in your home or office, follow this simple step-by-step guide. As a professional LED aluminum profile manufacturer from China, we’ll also share helpful tips and provide insight into choosing the right profiles for your LED strip lights.
Learn how to install LED aluminum profiles for linear lighting step by step. Discover how to protect your LED strips, improve heat dissipation, and create an elegant lighting effect with these easy-to-follow instructions from a leading China LED aluminum profile supplier.
Installing LED aluminum profiles is not only about improving the performance of your LED strip lights, but it also adds a sleek and modern touch to your lighting design. Whether you're lighting up a kitchen, office, or outdoor space, these profiles can be used for various applications. Let’s break down the installation process to make it simple for you.
What Are LED Aluminum Profiles?
LED aluminum profiles are specially designed channels that house LED strip lights. These profiles are made from high-quality aluminum, which helps with heat dissipation, extending the lifespan of your LED strips. They are available in different sizes, shapes, and finishes to fit various lighting needs and interior designs. LED aluminum profiles, also known as LED aluminum extrusions or channels, are essential for creating professional-looking LED installations.
What Tools Do You Need to Install LED Aluminum Profiles?
To properly install LED aluminum profiles, you will need the following tools:
- Screwdriver (for securing the profiles)
- Measuring Tape (for precise measurements)
- Miter Saw (for cutting profiles to the desired length)
- Drill (for making mounting holes)
- Adhesive or Screws (depending on the mounting method)
- LED Strips (make sure they fit into the profile)
These tools will help you complete the installation process quickly and accurately.
How to Install LED Aluminum Profiles Step by Step?
Follow these simple steps to install your LED aluminum profiles:
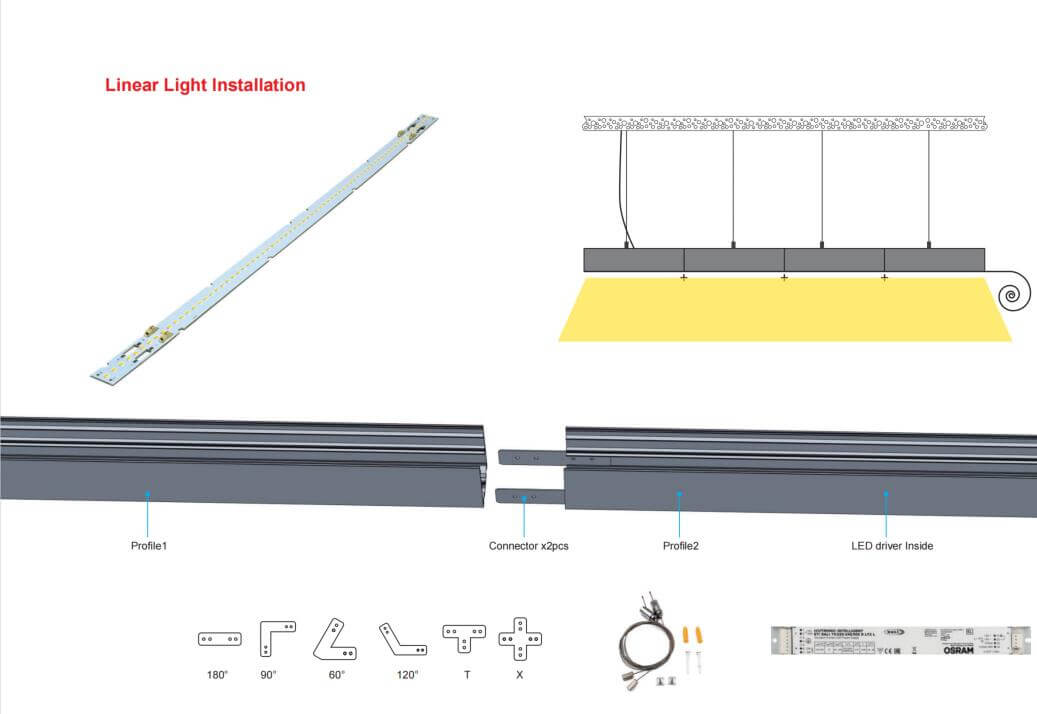
- Measure and Plan the Installation Area: Start by measuring the area where you want to install the LED aluminum profiles. Mark the points where the profiles will be placed, ensuring they are evenly spaced and aligned.
- Cut the Profiles to the Desired Length: Use a miter saw or hacksaw to cut the LED aluminum profiles to the required length. Be sure to wear safety glasses and gloves while cutting.
- Attach the Mounting Clips or Brackets: Depending on your profile design, you may need to use mounting clips or brackets to hold the profiles in place. Attach these to the wall or ceiling where the profiles will be installed.
- Insert the LED Strip Lights: Once the profile is securely mounted, carefully insert the LED strip lights into the aluminum channel. Make sure the LED strips are properly aligned and fit snugly within the profile.
- Connect the LED Strips to Power: Use the appropriate connectors or solder the wires to connect your LED strips to the power source. Ensure the voltage and power requirements are matched to avoid damage.
- Secure the Profile and Finish the Installation: Finally, secure the LED aluminum profiles to the mounting clips or brackets. If using adhesive, ensure it is properly bonded and holds the profile in place.
※ Claim 1: Ensure your LED aluminum profiles are compatible with the LED strips you're using to achieve optimal light output and cooling performance.
※ Claim 2: Make sure to check for any heat management issues when installing LED aluminum profiles in closed spaces to maintain the longevity of your LEDs.
What Are the Benefits of Using LED Aluminum Profiles?
LED aluminum profiles provide several advantages:
- Enhanced Heat Dissipation: The aluminum helps dissipate heat, preventing overheating and extending the lifespan of your LED strips.
- Improved Aesthetics: These profiles give your lighting setup a professional and sleek look, blending seamlessly with the interior design.
- Durability: LED aluminum channels are sturdy and protect your LED strips from physical damage and dust.
- Better Light Distribution: The profiles allow for uniform light diffusion, avoiding the “dots” effect often seen with bare LED strips.
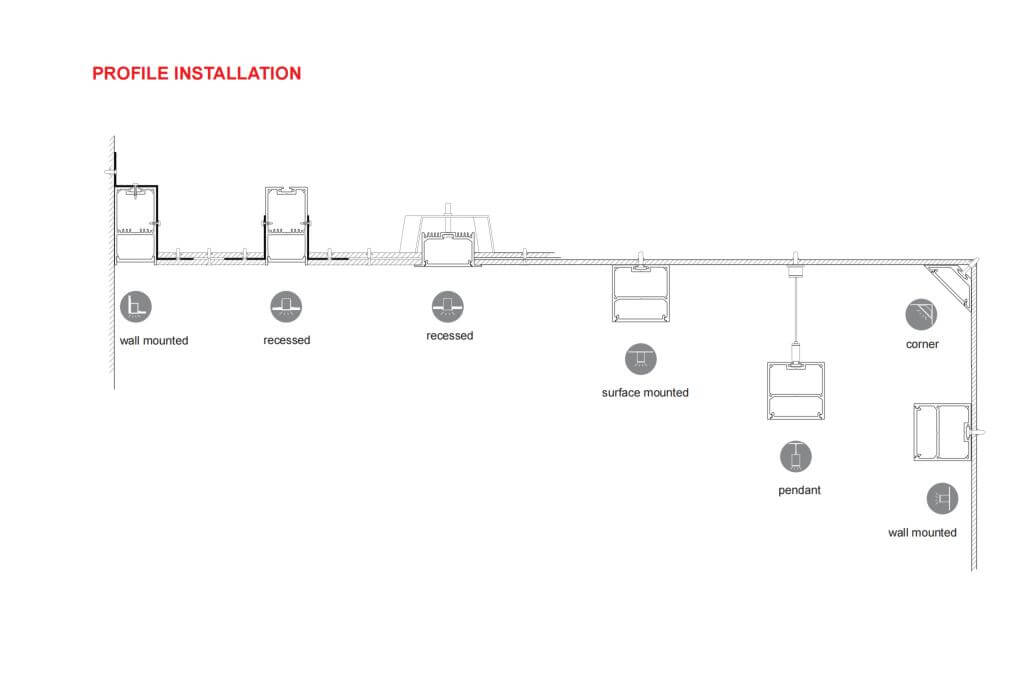
How to Choose the Right LED Aluminum Profiles?
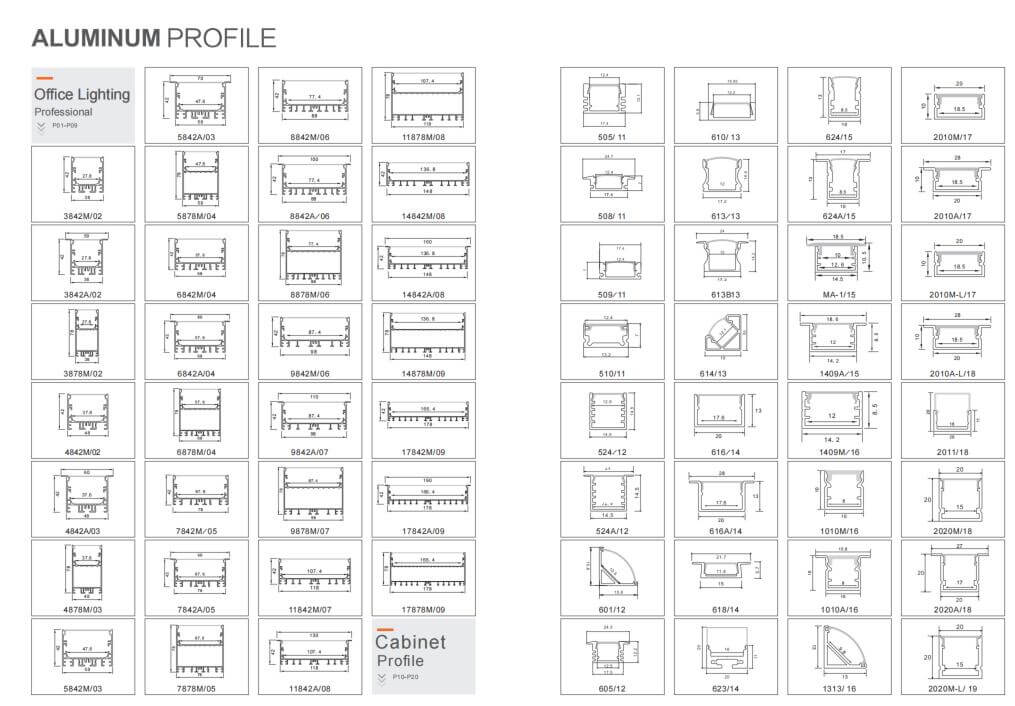
Choosing the right LED aluminum profile depends on several factors:
- Size and Shape: Consider the available space and the type of lighting effect you want to achieve.
- Mounting Type: Profiles can be surface-mounted, recessed, or suspended. Choose the one that suits your installation method.
- Finish: Opt for profiles with finishes that match the design of your room, such as anodized aluminum, matte black, or white.
※ Claim 1: As a leading China LED aluminum profile supplier, we offer a wide range of profiles to suit various installation needs and lighting effects.
※ Claim 2: You can find detailed information about our products and services on our website: Lightstec LED Aluminum Profiles.
Konklusion
Installing LED aluminum profiles is an excellent way to enhance the performance and appearance of your LED strip lights. By following these simple steps, you can achieve professional-looking lighting installations with ease. Whether you’re using LED strips for home decor or commercial spaces, these profiles will improve the longevity and efficiency of your lighting.
Q&A
1. Can I use any LED strip with aluminum profiles? Yes, as long as the LED strip fits into the profile, you can use any LED strip. Make sure the voltage and power ratings match.
2. How do I choose the right LED aluminum profile for my project? Consider the size, shape, and finish of the profiles to match your design needs. Also, choose profiles that fit your LED strips properly.
3. Do LED aluminum profiles improve light performance? Yes, they enhance heat dissipation, which helps maintain the performance and lifespan of your LED strips.
4. Can I install LED aluminum profiles outdoors? Yes, but ensure the profiles are designed for outdoor use and are properly sealed to prevent damage from weather.
5. How can I install LED aluminum profiles without drilling holes? You can use adhesive backing for a no-drill installation, though it may not be as sturdy as screws or clips.
People Also Care About These Questions:
- How to choose the right LED aluminum profiles for your project?
- What are the benefits of using LED aluminum extrusions?
- How to properly install LED strip lights in aluminum channels?
- What are the most common mistakes when installing LED aluminum profiles?
- What is the difference between LED aluminum channels and profiles?
Fremstillingsproces for LED Strip-lys
Produktion af LED-belysning kræver høj præcision, men mange producenter fremstiller deres lys på grundlæggende samlebånd. Vi regulerer og overvåger strengt alle behandlingstrin i vores produktionssystem. Vi har også et komplet sæt udstyr, der er beregnet til produktion og kvalitetskontrol. Vi beskæftiger erfarne ingeniører, som også er fabriksledere for at sikre streng kvalitetskontrol for hver enkelt LED-stribelys.
Vi håber, at dette indlæg vil øge din forståelse af LED-belysningsindustrien og give dig mulighed for at videreudvikle og udforske produktlinjen.

Trin 1. LED strip lys materiale IQC
Materialer ankom til fabrikken, uanset PCB, led, ic, modstand, aluminiumsprofil, kabler, skal QC-tjek. alle varer skal opfylde kravet. Kvalitetskontrol er det første, vi skal gøre, når alle materialer ankommer. Vi er nødt til at inspicere dem, om de er kvalificerede eller ej --- dog kan der stadig være nogle defekte produkter, der har gennemgået hele produktionsprocessen --- defekter i materialer, forarbejdning eller forsendelse.

Trin 2. Kontrol af LED-farvetemperatur
Nu, med alle nye LED-chips, skal du teste LED'ernes farvetemperatur. Lysstyrken af samme farve er ikke altid den samme. Farvegengivelsesindekset er også et emne, som du skal sikre klienten.

Trin 3. LED-tørproces
Normalt vil denne proces blive efterfulgt af SMT-processen. LED skal tørres, før den behandler SMT. Temperaturen på tørringen er ikke mindre end 65 ℃ på 8 timer.
Trin 4. LED strip lys SMT proces
LED strip lys SMT proces er meget udbredt i moderne belysningsenheder. Det sjove er, at SMT står for Surface Mount Technology, men teknologien til, hvordan man producerer LED'en, kaldes ikke bare mount surface, men inkluderer også en højhastigheds automatiseret maskine. Mange mennesker misforstår dette.

Trin 5. LED strip lys reflow loddeproces
Reflow loddeteknologi proces efter SMT, komponenterne og PCB ved hjælp af loddepastaen. PCB'en fra reflow loddemaskinen til en bestemt temperatur. Loddemassen ind i den flydende konsistens af smeltet, og derefter bundet til forskellige komponenter.

Trin 6. LED strip lys inspektionsproces
vi har 100% test for at sikre, at der ikke er nogen fysisk skade på produkterne. Den visuelle inspektion sikrer, at der ikke er farveskift i lysdioderne, og hvis nogen komponenter er forkert justeret i loddebroer.


Trin 7. LED strip lys lodning proces
Nogle små PCB med nul vinkel, blyfri loddeproces. Efter inspektion passerer LED-båndet gennem en loddemaskine, som forbinder 0,5 m bånd til 5 m lange strimler.

Trin 8. LED strip lys PCB ren proces
PCB-overfladen til LED-strimlen har en loddekolbe til at rengøre. Den første ting at gøre er stadig at lodde. Lod IC'en kan bruges til at forhindre oxidation under lodningsprocessen, og skær derefter den overskydende blytråd af i en rund tandpasta-tromle, som oxidation. Når alt dette er afsluttet, kan vi fortsætte med at rense det.

Trin 9. LED strip lys aldring proces
Faktisk skal alle LED-produkter have en belysningstest i 8 timer for at sikre, at hver LED kører i god stand. Og vi kan måle farverne under lystesten, og om lysdioderne har den rigtige farvetemperatur, og om chaufføren fungerer godt. Så dette er meget vigtigt for producenten at sikre, at alle lysdioder er ok.
Trin 10. LED strip lys vandtæt proces
LED strip lys er vandtætte og også rustbestandige, hvilket gør dem velegnede til en række anvendelser i og uden for huset. LED strip lys vandtætningsproces valg er et vigtigt skridt i fremstillingsprocessen. Der er højkvalitets IP65 siliciumrør vandtætte og IP67 silicium injektion vandtætte tilgængelige på markedet.

Trin 11. LED strip lys tilføje 3M tape proces
3M-tapen på båndets bagside giver forbrugerne bekvemmelighed og lethed ved installation af LED-båndbelysning.
Vi bruger 3M 9080 til alle de ikke-vandtætte og vandtætte strimler, nogle kunder efterspørger andet 3M klæbemiddel med bedre klæbrighed eller bedre termisk ledningsevne, som også er tilgængeligt.

Trin 12. Slutinspektion af LED-strimmellys
After the entire LED strip package has passed through our processing, LED Starlight's quality control department will perform a final check on our products. We not only make sure they have the same lighting color and are free from defects but also the appearance is good enough to meet the customers' requirements.
