
Haben Sie schon einmal einen LED-Streifen genau betrachtet und sich gefragt, was sich eigentlich darin befindet? Es sieht einfach aus – ein dünnes, flexibles Klebeband mit winzigen Lichtpunkten. Aber hinter diesem Band verbirgt sich eine Präzisionskonstruktion Leiterplatte mit echter Ingenieurskunst.
In diesem Leitfaden erklären wir den Aufbau eines LED-Streifens – die Komponenten, die Leiterplatte, das Schaltungsdesign und den Herstellungsprozess –, damit Sie genau verstehen, was Sie kaufen.
01 Anatomie eines LED-Streifens
Ein typischer LED-Streifen besteht aus sechs zusammenarbeitenden Kernkomponenten:
Die Lichtquelle
Oberflächenmontierte LEDs (SMD) oder Chip-on-Board (COB), die das Licht ausstrahlen. Chipmarke und Binning entscheiden über die Qualität.
Die Platine
Eine flexible Leiterplatte, die Strom überträgt und alle Komponenten verbindet. Das Rückgrat des Streifens.
Aktuelle Kontrolle
Kleine Widerstände, die den Strom zu jeder LED-Gruppe begrenzen, sie schützen und die Helligkeit stabil halten.
Stabilität
Komponenten, die die Spannung glätten und das Flimmern im Stromkreis reduzieren.
Die Drähte
Auf der Leiterplatte sind dünne Kupferleiterbahnen aufgedruckt, die den Strom entlang des Streifens transportieren. Breiteres Kupfer bedeutet weniger Spannungsabfall.
Die Installation
3M-Kleber (und manchmal eine abnehmbare Folie), mit dem Sie den Streifen auf fast jede saubere Oberfläche kleben können.
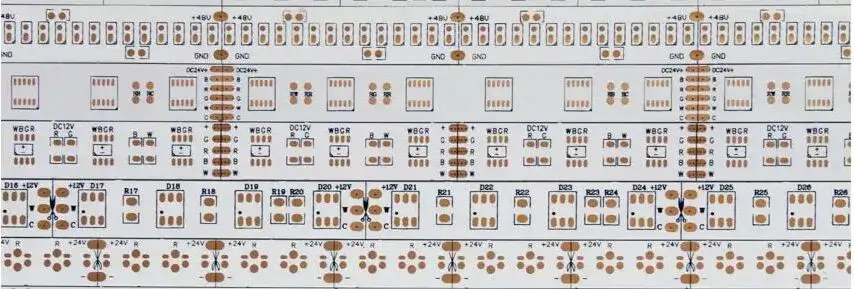
Mehr als man auf den ersten Blick sieht
Die Komponenten, die Sie sehen können – die LEDs – sind nur ein Teil der Geschichte. Der Schaltungsdesign und Kupferqualität In der Platine versteckte LEDs bestimmen, ob Ihr Streifen hell, stabil und lang läuft.
Erfahren Sie mehr über die Chipqualität in unserem Leitfaden zu SMD-LEDs Und COB-Streifen.
02 Die Leiterplatte: Das Rückgrat des Streifens
Der Leiterplatte (PCB) ist es, was einen Streifen zu einem Streifen macht. Es handelt sich um eine flexible Schicht aus Kupferfolie und Isoliermaterial, die alle Komponenten mit gedruckten Leiterbahnen verbindet.
Wie eine flexible Leiterplatte aufgebaut ist
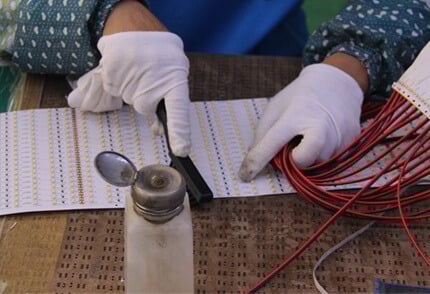
Kupferqualität und -breite sind enorm wichtig: Dickeres, breiteres Kupfer führt mehr Strom bei geringerem Spannungsabfall, wodurch das andere Ende eines langen Laufs genauso hell bleibt wie der Anfang.
03 Funktionsweise der Schaltung: Serie vs. Parallel
Im Inneren des Streifens sind die LEDs auf zwei Arten angeordnet: Serie Und parallel. Jeder verhält sich anders, wenn etwas schief geht.
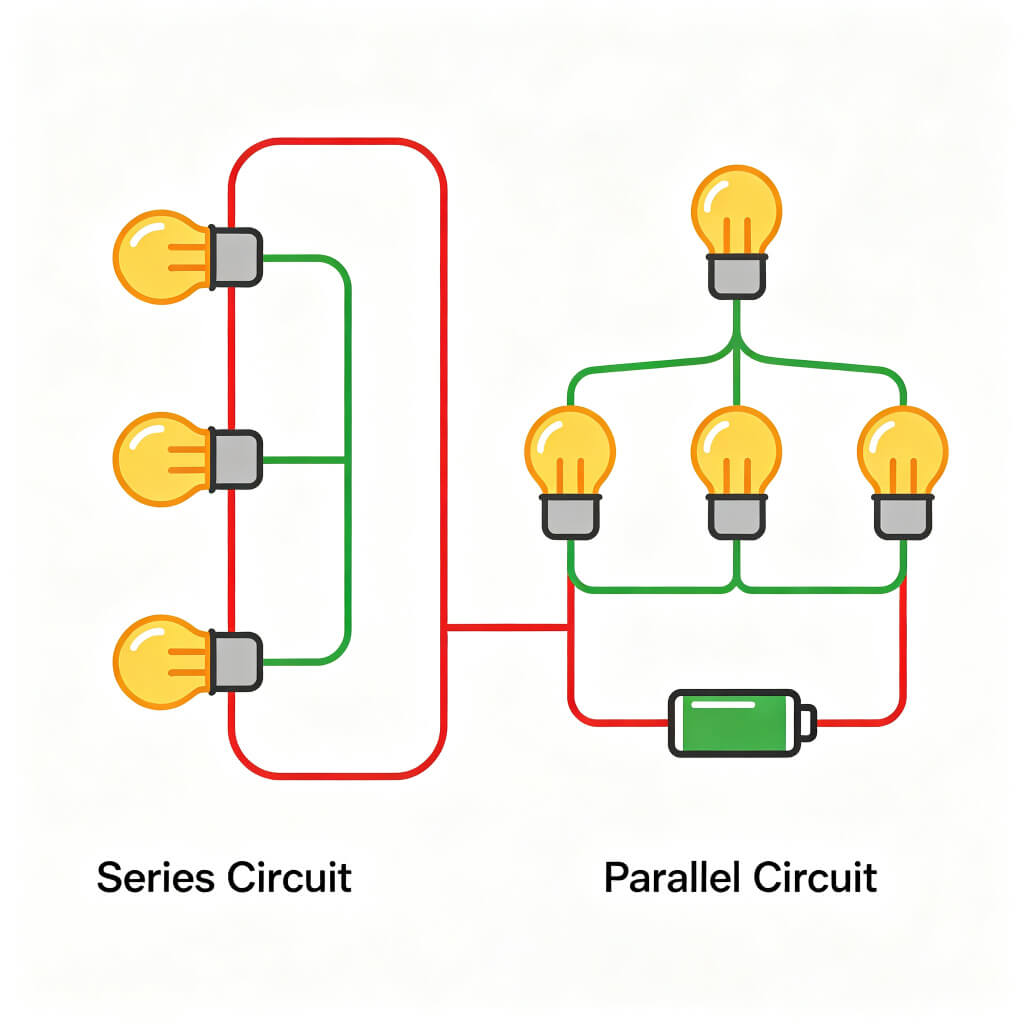
Reihenschaltung
LEDs sind in einer einzigen Schleife verbunden. Der Strom ist in jeder LED gleich und die Spannung summiert sich (V = n × Vf). Wenn Wenn eine LED ausfällt, wird die gesamte Gruppe dunkel.
Parallelschaltung
LEDs werden über die gleiche Spannung angeschlossen. Jeder Zweig erhält seinen eigenen Strom. Wenn Eine LED fällt aus, die anderen funktionieren weiter – Dies ist das sicherere und häufigere Design bei Qualitätsstreifen.
| Besonderheit | Serie | Parallel |
|---|---|---|
| Aktuell | Bei jeder LED gleich | Aufgeteilt pro Filiale |
| Stromspannung | Summiert (V = n × Vf) | In allen Filialen gleich |
| Wenn eine LED ausfällt | Die ganze Gruppe wird dunkel | Andere arbeiten weiter |
| Wird in LED-Streifen verwendet | Selten (nur Gruppen) | Standardausführung |
04 Von der Platine bis zum fertigen Streifen
Die Herstellung eines hochwertigen LED-Streifens ist ein Präzisionsprozess. Hier ist die Reise in eine Fabrik:


Dieser vollständige Prozess entspricht genau der Art und Weise, wie wir bei KayTai Streifen herstellen. Sehen Sie es sich Schritt für Schritt in unserem Leitfaden an wie LED-Lichtbänder hergestellt werden, und unsere streng Qualitätskontrolle System.
05 Warum Bauqualität wichtig ist
Zwei Streifen können auf der Oberfläche identisch aussehen und im Inneren völlig unterschiedlich sein. Das leistet gutes Bauen:
Konsistente Helligkeit
Gleichmäßiges Licht über die gesamte Strecke – kein Dimmen am Ende.
Längeres Leben
Geeignete Widerstände und Kondensatoren schützen LEDs vor Stromspitzen.
Zuverlässiges Löten
Sauberes Reflow-Löten verhindert tote Abschnitte und Flicker.
Echte Farbe
Gutes Binning bedeutet, dass jeder Zähler mit dem nächsten übereinstimmt.
So erkennen Sie einen gut gebauten Streifen
- Überprüfen Sie die Kupferbreite an den Schnittpunkten
- Achten Sie auf saubere, gleichmäßige Lötstellen
- Überprüfen Sie die LED-Marke und das Binning
- Bestätigen Sie die CRI- und SDCM-Spezifikationen
- Kaufen Sie bei einem Hersteller mit umfassender Qualitätskontrolle – nicht nur bei einem Wiederverkäufer
Stöbern Sie direkt in unserer Fabrik LED-Streifenlichter Und einfarbige Streifen.
06 FAQ zum Aufbau von LED-Streifen
Q1Warum haben LED-Streifen Widerstände?
Widerstände begrenzen den Strom, der zu jeder LED-Gruppe fließt. Ohne sie könnten Stromspitzen überhitzen und die Chips durchbrennen oder eine ungleichmäßige Helligkeit verursachen.
Q2Was ist der Unterschied zwischen seriellen und parallelen LED-Streifen?
Serie verbindet LEDs in einer Schleife (ein Fehler tötet die Gruppe); Parallelschaltung verbindet sie mit derselben Spannung (ein Fehler lässt den Rest funktionieren). Qualitätsstreifen verwenden paralleles Design.
Q3Beeinflusst die Platine die Helligkeit?
Ja. Breitere Kupferleiterbahnen führen mehr Strom bei geringerem Spannungsabfall und sorgen dafür, dass das andere Ende einer langen Leitung hell bleibt. Dünneres Kupfer führt dazu, dass die Helligkeit entlang des Streifens nachlässt.
Q4Wie werden LED-Chips am Streifen befestigt?
Die Chips werden von einer SMT-Bestückungsmaschine platziert und dann durch Reflow-Löten befestigt – ein Prozess, bei dem Lotpaste geschmolzen wird, um starke, zuverlässige Verbindungen herzustellen.
Benötigen Sie individuelle LED-Streifen?
Unsere Fabrik unterstützt kundenspezifische Leiterplatten, Chips, Längen und Verpackungen. Fragen Sie uns nach einem Angebot.

Tolle Erklärung, wie LED-Streifen tatsächlich funktionieren. Die Beschreibung des Schaltungsaufbaus und der Widerstandsfunktion ist für einen Anfänger einfach genug, für einen Installateur jedoch genau genug. Die Schnitterklärung war besonders klar.
Interessante Lektüre. Endlich verstehe ich, warum die Schnittpunkte wichtig sind und wie das Schaltungsdesign funktioniert. Die Diagramme würden jedem, der neu im Umgang mit LED-Streifen ist, einen sicheren Einstieg erleichtern.
Die Erklärung zum PCB-Aufbau ist genau das, was ich brauchte, um meinen Kunden zu erklären, warum manche Streifen an den Schnittpunkten versagen. Das Kupferschichtdiagramm macht das Stromflusskonzept leicht verständlich. Solider technischer Artikel.