
Inhaltsverzeichnis
- Was Sie brauchen
- So schneiden Sie LED-Streifenlichter
- So schließen Sie LED-Streifen an
- So installieren Sie LED-Streifenlichter Schritt für Schritt
- Tipps zur Installation von LED-Streifen und häufige Fehler, die Sie vermeiden sollten
- Häufig gestellte Fragen zu LED-Streifenleuchten
- Benötigen Sie Hilfe bei der Auswahl oder dem Zuschnitt von LED-Streifen?
LED-Streifenlichter sind eine vielseitige und energieeffiziente Beleuchtungsoption, die jedem Raum eine lebendige und farbenfrohe Atmosphäre verleihen kann. Ganz gleich, ob Sie architektonische Elemente hervorheben, stimmungsvolles Licht schaffen oder Ihre Inneneinrichtung aufwerten möchten, die Installation von LED-Lichtbändern ist ein relativ einfaches und lohnendes DIY-Projekt. In diesem Artikel führen wir Sie Schritt für Schritt durch den Prozess des Zuschneidens und Anschließens von LED-Lichtbändern in Ihrem Zuhause.
Am Ende dieses Leitfadens wissen Sie genau, wie Sie:
- Schneiden Sie LED-Streifen an der richtigen Stelle, ohne die Chips zu beschädigen
- Verbinden und verlängern Sie Streifen mit Steckverbindern oder durch Löten
- Mit Kleber, Clips und Aluprofilen sauber montieren
- Vermeiden Sie häufige Fehler, die die Lebensdauer Ihrer Streifen verkürzen
Was Sie brauchen
Bevor Sie beginnen, besorgen Sie sich die notwendigen Werkzeuge und Materialien:
- LED-Lichtbänder: Wählen Sie die passende Länge und Farbe für Ihren Verwendungszweck. Messen Sie den Raum aus, in dem Sie die Leuchten installieren möchten, um eine genaue Dimensionierung sicherzustellen.
- Stromversorgung: Wählen Sie ein kompatibles Netzteil basierend auf den Anforderungen Ihrer LED-Streifenlichter.
- Anschlüsse für LED-Streifen: Diese sind optional, können aber beim Verlängern oder Verbinden mehrerer LED-Streifen hilfreich sein.
- Abisolierzangen: Zum Zuschneiden der LED-Lichtbänder auf die gewünschte Länge.
- Doppelseitiges Klebeband: Stellen Sie sicher, dass es ausreichend Festigkeit hat, um die LED-Streifen an Ort und Stelle zu halten.
- Schere: Zum Zuschneiden der LED-Lichtbänder und des Klebebands.
- Eine Bohrmaschine und Schrauben: Wenn Sie das Netzteil an einer Wand oder unter einem Schrank befestigen möchten.
- Aluminiumprofil (optional): Für eine saubere, vertiefte Oberfläche und eine bessere Wärmeableitung – schauen Sie sich unsere an Kaufratgeber für LED-Aluminiumprofile.
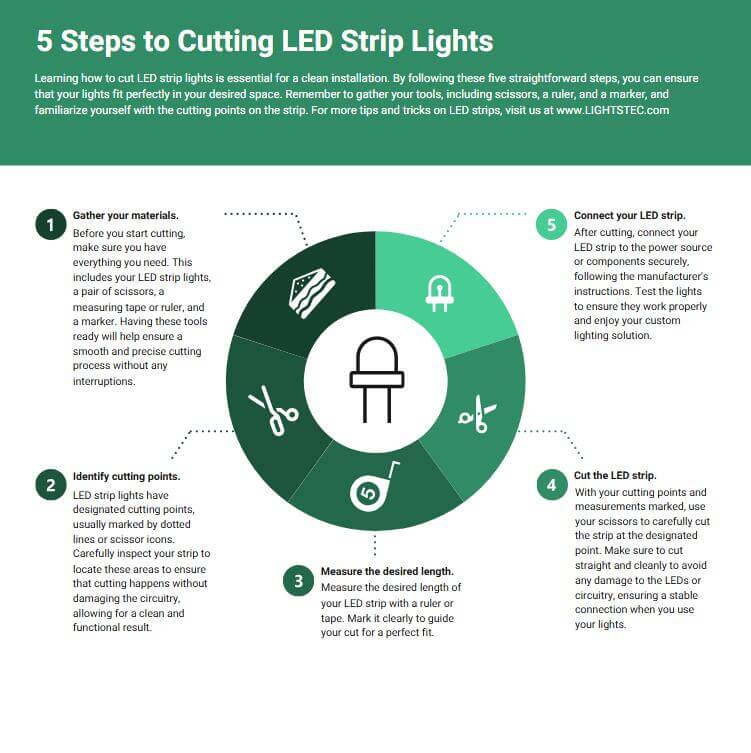
So schneiden Sie LED-Streifenlichter
LED-Streifen sehen aus wie ein durchgehendes Band, bestehen aber tatsächlich aus sich wiederholenden Abschnitten. Alle paar LEDs finden Sie ein Paar Kupferpads mit einem Scherensymbol oder einer gestrichelten Linie auf dem Streifen. Das ist das Der einzige sichere Ort zum Schneiden.
Wenn Sie an einer anderen Stelle schneiden, werden die LED-Chips oder der Schaltkreis durchtrennt und dieser Teil des Streifens zerstört. Dies gilt sowohl für SMD-Streifen als auch COB-LED-Streifen – Schneiden Sie immer genau an der markierten Linie.
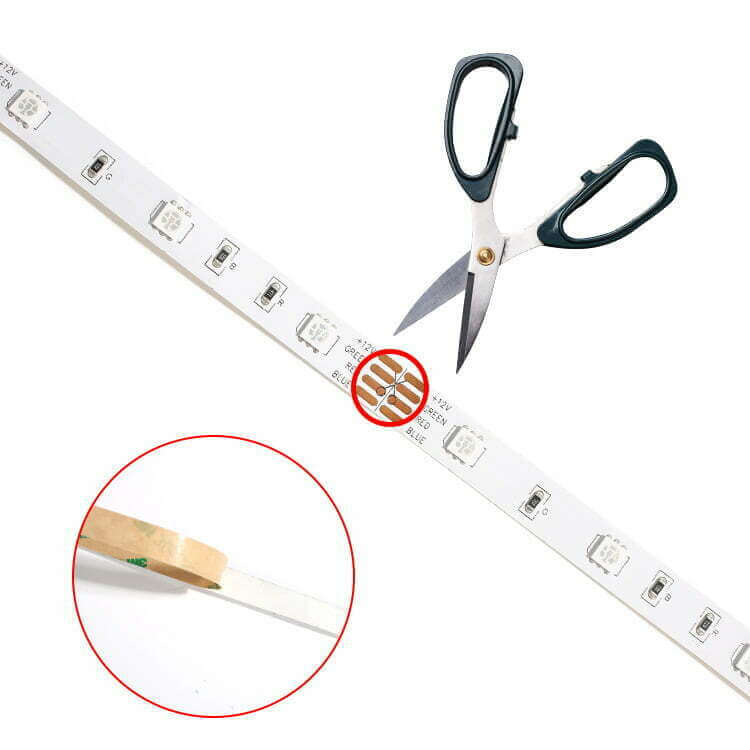

So schneiden Sie sicher in 3 einfachen Schritten
- 1. Zweimal messen. Schneiden Sie den Streifen etwas länger ab, als Sie benötigen – Sie können immer mehr abschneiden, aber Sie können die Länge nicht wieder hinzufügen.
- 2. Schneiden Sie die Kupferpads auf. Schneiden Sie mit einer scharfen Schere gerade über die markierte Linie zwischen den Pads.
- 3. Bereiten Sie das Ende vor. Wenn Sie löten möchten, legen Sie mit einem Messer einen kleinen Bereich der Kupferpads frei, bevor Sie die Drähte anschließen.
So schließen Sie LED-Streifen an
Sobald Ihre Streifen auf Länge geschnitten sind, müssen Sie sie häufig um eine Ecke verbinden oder verlängern, um eine längere Strecke abzudecken. Es gibt zwei zuverlässige Möglichkeiten, LED-Streifen anzuschließen: mit Anschlüssen (schnell, werkzeuglos) oder durch Löten (am stärksten, für dauerhafte Installationen).
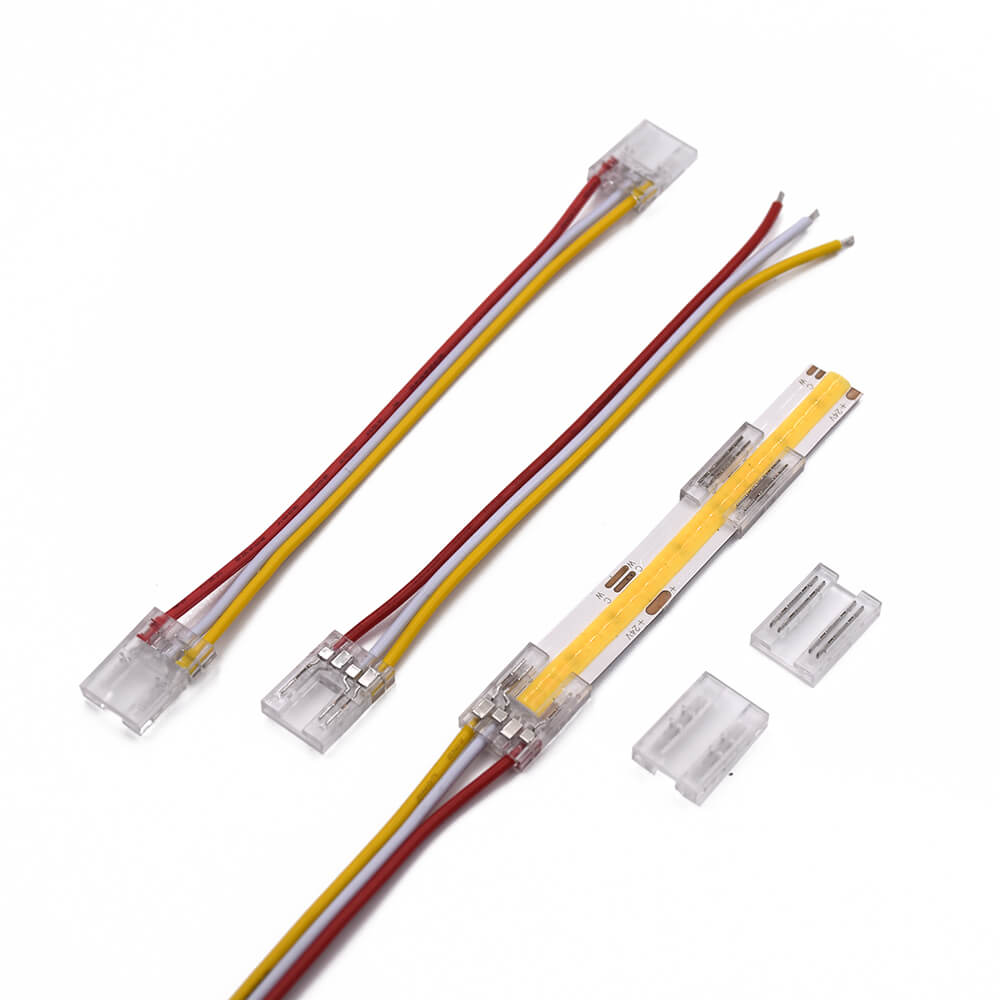
Option 1 – LED-Streifenverbinder verwenden (kein Löten)
Verbinder sind die einfachste Möglichkeit, Streifen zu verbinden. Öffnen Sie einfach den Stecker, schieben Sie das abgeschnittene Ende des Streifens hinein, sodass die Kupferpads die Metallklammern berühren, und schließen Sie dann den Verschluss. Das klappt bei den meisten gut einfarbig Und RGBW-Streifen.
Option 2 – Drähte verlöten (stärkste Verbindung)
Für eine dauerhafte Installation ist Löten die zuverlässigste Methode. Verzinnen Sie die Kupferpads, löten Sie dann die positiven (+) und negativen (-) Drähte darauf und schützen Sie die Verbindung mit einem Schrumpfschlauch. Achten Sie sorgfältig auf die Polarität – eine Vertauschung kann die LEDs beschädigen. Diese Methode funktioniert sowohl bei Standard-SMD-Streifen als auch hervorragend COB-LED-Streifen.

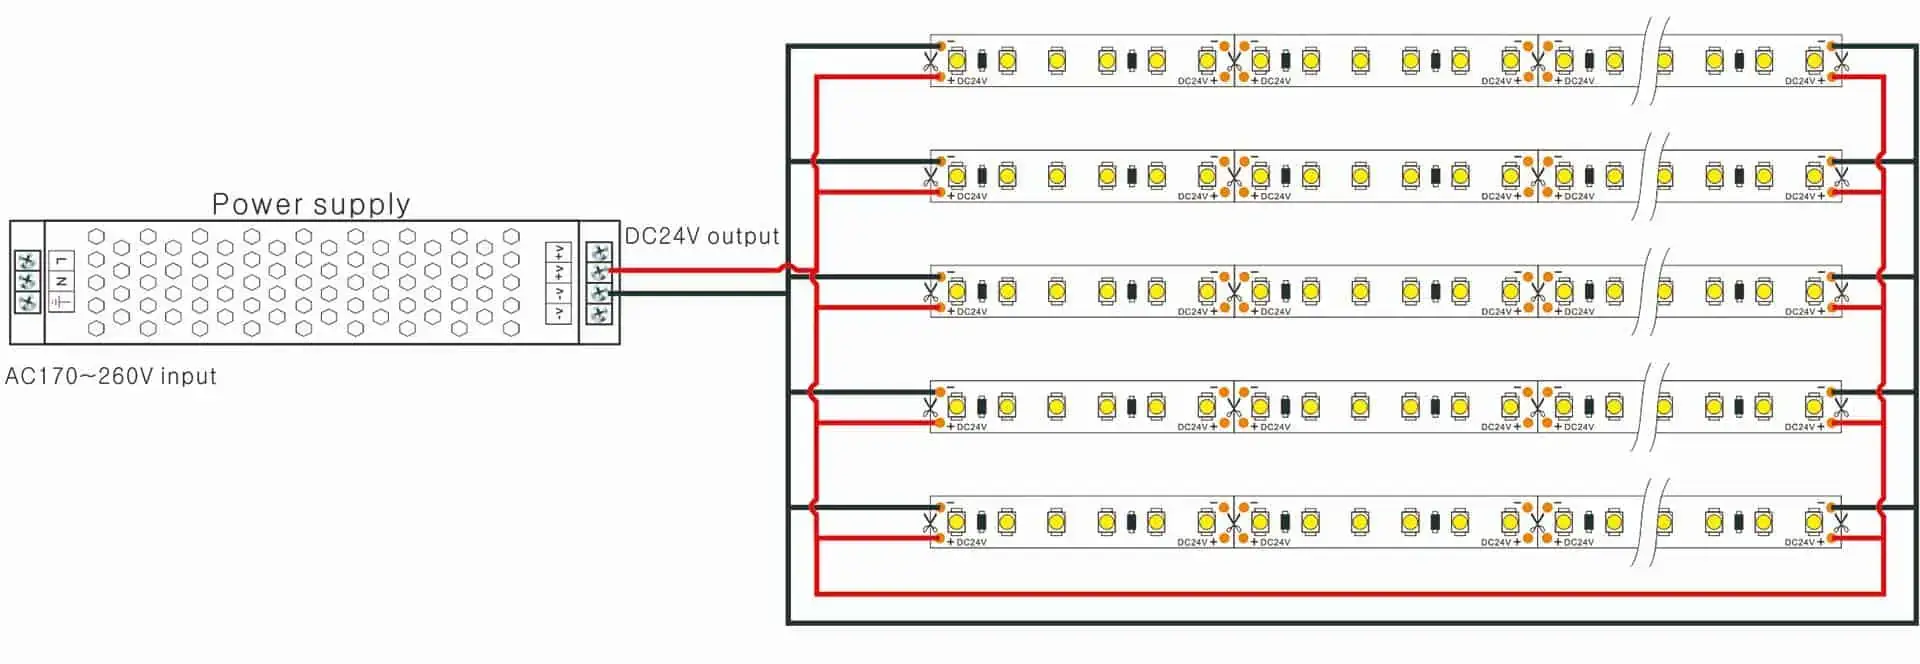
Denken Sie bei langen Läufen daran, dass LED-Streifen einen maximalen Abstand von der Stromversorgung haben (normalerweise etwa 5 Meter für einen einzelnen Lauf mit 12 V). Wenn Sie mehr abdecken müssen, verlegen Sie ein dickeres Stromkabel und speisen Sie den Strom von mehreren Punkten aus ein. Erfahren Sie, wie Sie die richtigen Streifen auswählen für Ihr Projekt, bevor Sie kaufen.
So installieren Sie LED-Streifenlichter Schritt für Schritt
Kommen wir nun zum Installationsprozess!
1. Planung
Entscheiden Sie, wo Sie die LED-Lichtbänder installieren möchten, und legen Sie den Weg fest, dem sie folgen sollen. Berücksichtigen Sie eventuelle Hindernisse wie Ecken oder Möbel und planen Sie entsprechend.
2. Bereiten Sie die Oberfläche vor
Stellen Sie sicher, dass die Oberfläche, auf der Sie die LED-Streifen anbringen, sauber und trocken ist. Wischen Sie Staub und Schmutz ab, die die Haftung beeinträchtigen könnten.
3. Schneiden Sie die Lichtbänder ab
LED-Lichtbänder werden meist auf Rollen geliefert und können auf jede gewünschte Länge zugeschnitten werden. Die meisten Streifen weisen Markierungen auf, die angeben, wo Sie sicher schneiden können. Schneiden Sie mit einer Schere entlang der markierten Linien.
4. Befestigen Sie die Streifen
Entfernen Sie die Schutzfolie vom doppelseitigen Klebeband und kleben Sie es auf die Rückseite der LED-Lichtbänder. Drücken Sie das Klebeband fest auf die Oberfläche, auf der Sie die Leuchten anbringen möchten. Achten Sie darauf, dass der Anfang des Streifens mit dem Anfang Ihrer geplanten Route übereinstimmt.
5. Verbinden Sie die Streifen (optional)
Wenn Sie die Länge der LED-Lichtleisten verlängern müssen, verwenden Sie LED-Lichtleistenverbinder, um die abgeschnittenen Enden der Streifen miteinander zu verbinden. Befolgen Sie die Anweisungen des Herstellers, um die Streifen sicher zu verbinden.
6. Netzteil montieren (optional)
Wenn Sie ein Netzteil verwenden, suchen Sie einen geeigneten Standort in der Nähe einer Steckdose. Befestigen Sie das Netzteil mit einer Bohrmaschine mit Schrauben an der Wand oder der Unterseite eines Schranks.
7. Schließen Sie die Stromversorgung an
Befestigen Sie die Drähte der LED-Lichtbänder gemäß den mitgelieferten Anweisungen an der Stromversorgung. Stellen Sie sicher, dass die positiven (+) und negativen (-) Anschlüsse richtig zueinander passen, um eine Beschädigung der Lichter zu vermeiden.
8. Testen Sie die Lichter
Bevor Sie die LED-Lichtbänder vollständig befestigen, schließen Sie das Netzteil an und testen Sie die Lichter, um sicherzustellen, dass sie ordnungsgemäß funktionieren. Nehmen Sie bei Bedarf alle notwendigen Anpassungen oder Korrekturen vor.
9. Befestigen Sie die Lichter
Wenn Sie mit der Platzierung und Funktionalität der LED-Lichtbänder zufrieden sind, drücken Sie sie fest an. Stellen Sie sicher, dass der Kleber gut auf der Oberfläche haftet.
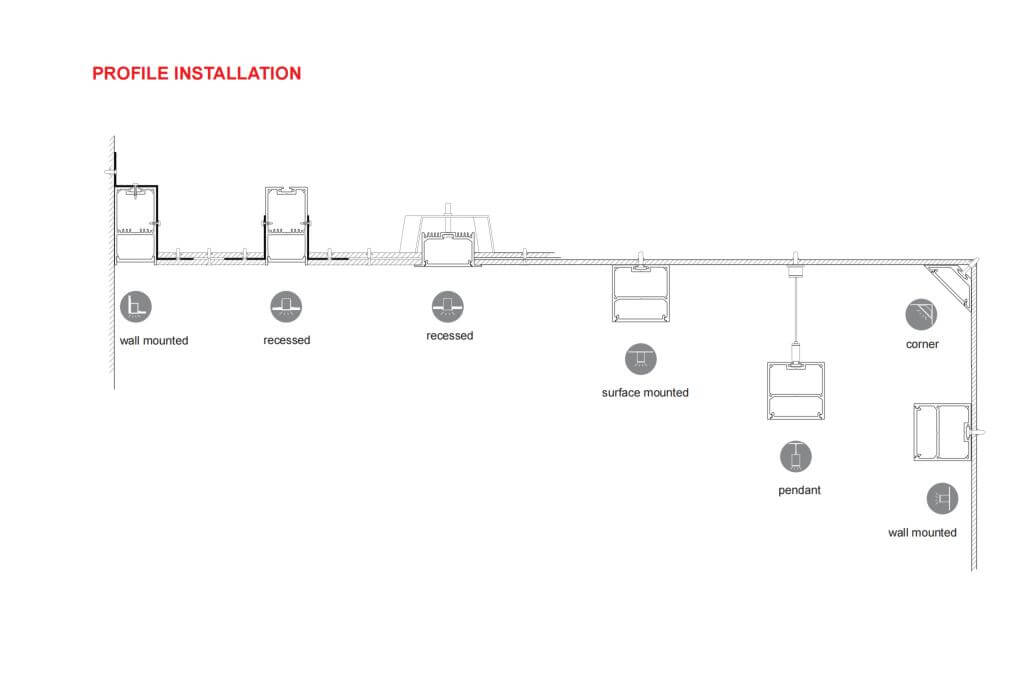
Für ein wirklich professionelles Finish installieren Sie die Streifen in einem LED-Aluminiumprofil mit Diffusor. Dadurch werden die Dioden ausgeblendet, das Licht wird weicher und die Streifen bleiben kühl, sodass sie länger halten.
Tipps zur Installation von LED-Streifen und häufige Fehler, die Sie vermeiden sollten
- Schneiden Sie nicht an der falschen Stelle. Schneiden Sie immer auf den markierten Kupferpads, niemals durch die LEDs.
- Vertauschen Sie nicht die Polarität. Verbinden Sie Plus mit Plus und Minus mit Minus, um den Stromkreis zu schützen.
- Überladen Sie den Streifen nicht. Überprüfen Sie die maximale Lauflänge für Ihre Spannung, um eine gleichmäßige Helligkeit zu gewährleisten.
- Verwenden Sie einen Diffusor für ein glattes Aussehen. Nackte LEDs sehen fleckig aus – a Profil mit Diffusor sorgt für einen sauberen, gleichmäßigen Glanz.
- Testen Sie, bevor Sie kleben. Es ist viel einfacher, einen Verkabelungsfehler zu beheben, bevor das Klebeband an der Wand befestigt wird.
Sie sind sich nicht sicher, welche Leiste für Ihr Zimmer geeignet ist? Unser Anleitung zur Beleuchtung von LED-Streifen führt Sie durch die Auswahl von Farbe, Helligkeit und Typ.
Häufig gestellte Fragen zu LED-Streifenleuchten
Schnelle Antworten auf die Fragen, die wir am häufigsten zum Thema Schneiden und Verbinden von LED-Streifen hören.
Q1. Kann ich LED-Streifen überall schneiden?
Nein – schneiden Sie immer genau an der markierten Linie zwischen den Kupferpads. Durch das Schneiden an anderer Stelle wird der LED-Schaltkreis beschädigt.
- Schnittmarkierungen und Scherensymbole zeigen die sicheren Schnittpunkte an
- Jeder Schnittabschnitt behält seinen gesamten 12-V-/24-V-Stromkreis intakt
- Sowohl SMD- als auch COB-Streifen folgen dieser Regel
Q2. Kann man mehrere LED-Streifen miteinander verbinden?
Ja. Verwenden Sie einen Steckverbinder oder Lötdrähte, um die Streifen Ende an Ende zu verbinden, und achten Sie auf die maximale Lauflänge für Ihr Netzteil.
- Anschlüsse sind am schnellsten und werkzeuglos
- Durch Löten erhält man die haltbarste Verbindung
- Fügen Sie bei Läufen über 5 Meter mehr Strom an beiden Enden hinzu
Q3. Brauche ich einen Stecker oder soll ich löten?
Das hängt von der Aufgabe ab – Steckverbinder eignen sich hervorragend für schnelle DIY-Installationen, Löten eignet sich am besten für dauerhafte oder vibrationsintensive Anwendungen.
- Anschlüsse: kein Werkzeug, einfach zu entfernen und wiederzuverwenden
- Löten: stärkste Verbindung und geringster Widerstand
- Beide eignen sich gut für Niederspannungs-12-V-/24-V-Streifen
Q4. Wie lange kann ich LED-Lichtbänder betreiben?
Bei 12 V sollte eine einzelne Strecke unter etwa 5 Metern bleiben; bei 24V bis zu etwa 10 Meter. Bei längeren Läufen Strom von mehreren Punkten einspeisen.
- Ein Spannungsabfall führt dazu, dass das andere Ende dunkler aussieht
- Ein dickeres Stromkabel reduziert den Spannungsabfall
- Verwenden Sie für lange Strecken eine höhere Spannung oder eine Parallelverkabelung
Glückwunsch! Sie haben erfolgreich LED-Streifenleuchten installiert und Ihren Raum mit atemberaubender, energieeffizienter Beleuchtung verwandelt. Lehnen Sie sich jetzt zurück, entspannen Sie sich und genießen Sie die lebendige Atmosphäre, die sie in Ihr Zuhause bringen!
Es ist erwähnenswert, dass es immer ratsam ist, einen professionellen Elektriker um Hilfe zu bitten, wenn Sie sich bei der Arbeit mit Elektrizität unwohl fühlen oder sich über den Installationsprozess unsicher sind. Denken Sie daran, die Sicherheitsrichtlinien zu befolgen und beim Umgang mit elektrischen Bauteilen Vorsicht walten zu lassen.
Benötigen Sie Hilfe bei der Auswahl oder dem Zuschnitt von LED-Streifen?
Teilen Sie uns Ihre Projektdetails mit – Länge, Farbe und Spannung – und unser Werksteam wird Ihnen die richtigen Streifen empfehlen und Ihnen ein kostenloses Angebot zusenden.

Eine klare Anleitung zum Schneiden und Verbinden von Streifen. Die Erklärung der Schnittlinien und die Verbindungsoptionen sind leicht zu verstehen. Die Lötspitzen sind nützlich für individuelle Verbindungen.
Eine klare Anleitung zum Schneiden und Verbinden von Streifen. Die Erklärung der Schnittlinien und der Verbindungsoptionen ist leicht verständlich. Die Lötspitzen sind nützlich für individuelle Verbindungen.