LED şerit ışıklar, her mekana canlı ve renkli bir ambiyans katabilecek çok yönlü ve enerji tasarruflu bir aydınlatma seçeneğidir. Mimari unsurları vurgulamak, ortam aydınlatması oluşturmak veya ev dekorunuzu geliştirmek istiyorsanız, LED şerit ışıkların takılması nispeten basit ve ödüllendirici bir DIY projesidir. Bu yazıda, evinize LED şerit ışıkların takılması sürecinde size adım adım rehberlik edeceğiz.
LED Şerit Işıklar Nasıl Kesilir
Başlamadan önce gerekli araç ve malzemeleri toplayın:
- LED şerit ışıklar: Kullanım amacınıza uygun uzunluğu ve rengi seçin. Doğru boyutlandırmayı sağlamak için ışıkları kurmayı planladığınız alanı ölçün.
- Güç kaynağı: LED şerit ışıklarınızın gereksinimlerine göre uyumlu bir güç kaynağı seçin.
- LED şerit ışık konnektörleri: Bunlar isteğe bağlıdır ancak birden fazla LED şeridi uzatmak veya bağlamak için yararlı olabilir.
- Kablo sıyırıcılar: LED şerit ışıklarını istenilen uzunluğa kesmek için.
- Çift taraflı yapışkan bant: LED şerit ışıklarını yerinde tutmak için yeterli güce sahip olduğundan emin olun.
- Makas: LED şerit ışıklarını ve yapışkan bandı kesmek için.
- Elektrikli matkap ve vidalar: Güç kaynağını bir duvara veya dolabın altına takmak istiyorsanız.
Şimdi kurulum sürecine geçelim!
- Planlama: LED şerit ışıklarını nereye kurmak istediğinize karar verin ve takip etmelerini istediğiniz yolu planlayın. Köşe veya mobilya gibi engelleri göz önünde bulundurun ve buna göre plan yapın.
- Yüzeyi hazırlayın: LED şerit ışıkları takacağınız yüzeyin temiz ve kuru olduğundan emin olun. Yapışmayı engelleyebilecek toz veya kalıntıları silin.
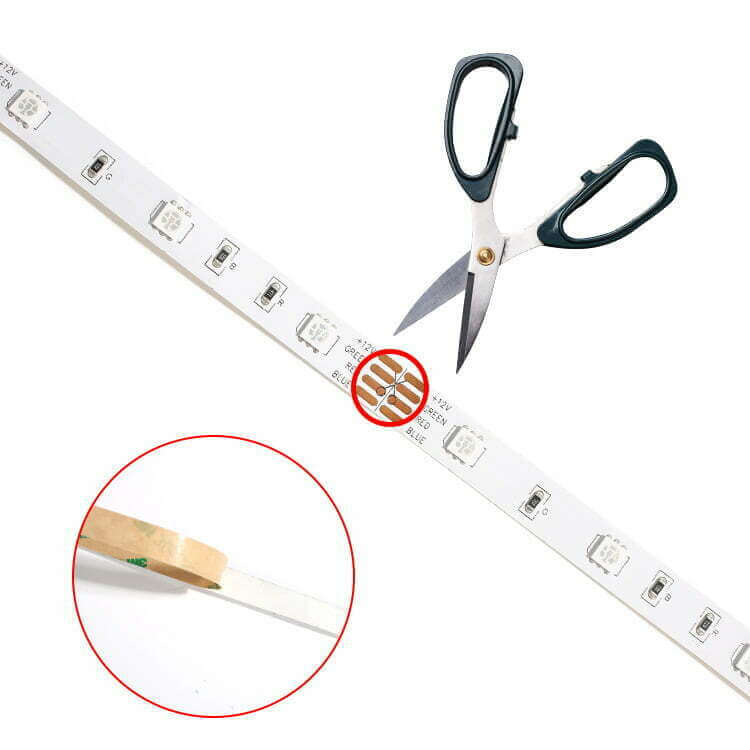
- Şerit ışıkları kesin: LED şerit ışıkları genellikle rulo halinde gelir ve istenilen uzunluğa uyacak şekilde kesilebilir. Çoğu şeritte güvenli bir şekilde nerede kesebileceğinizi gösteren işaretler bulunur. Belirlenen çizgiler boyunca kesmek için makas kullanın.
- Şeritleri takın: Çift taraflı yapışkan bandın arkasını çıkarın ve bunu LED şerit ışıkların arkasına uygulayın. Bandı, ışıkları takmak istediğiniz yüzeye sıkıca bastırın. Şeridin başlangıcını planladığınız rotanın başlangıcıyla hizalamaya dikkat edin.
- Şeritleri bağlayın (isteğe bağlı): LED şerit ışıkların uzunluğunu uzatmanız gerekiyorsa, şeritlerin kesik uçlarını birleştirmek için LED şerit ışık konektörlerini kullanın. Şeritleri güvenli bir şekilde bağlamak için üreticinin talimatlarını izleyin.
- Güç kaynağını monte edin (isteğe bağlı): Güç kaynağı kullanıyorsanız, elektrik prizinin yakınında uygun bir yer bulun. Güç kaynağını vidalarla duvara veya kabinin alt kısmına sabitlemek için elektrikli matkap kullanın.
- Güç kaynağını bağlayın: Sağlanan talimatları izleyerek LED şerit ışıklarının kablolarını güç kaynağına bağlayın. Işıklara zarar vermemek için pozitif (+) ve negatif (-) terminalleri doğru şekilde eşleştirdiğinizden emin olun.
- Işıkları test edin: LED şerit ışıklarını tam olarak sabitlemeden önce, güç kaynağını takın ve düzgün çalıştıklarından emin olmak için ışıkları test edin. Gerekirse gerekli ayarlamaları veya düzeltmeleri yapın.
- Işıkları sabitleyin: LED şerit ışıkların yerleşimi ve işlevselliğinden memnun kaldığınızda, bunları sıkıca yerine bastırın. Yapıştırıcının yüzeye iyice yapıştığından emin olun.
Tebrikler! LED şerit ışıkları başarıyla monte ettiniz ve alanınızı çarpıcı, enerji tasarruflu aydınlatmayla dönüştürdünüz. Şimdi arkanıza yaslanın, rahatlayın ve evinize getirdikleri canlı ortamın tadını çıkarın!
Elektrikle çalışmaktan rahatsızlık duyuyorsanız veya kurulum sürecinden emin değilseniz, yardım için profesyonel bir elektrikçiye danışmanız her zaman akıllıca olacaktır. Güvenlik kurallarına uymayı ve elektrikli bileşenleri kullanırken dikkatli olmayı unutmayın.