How to Install LED Aluminum Profiles for Linear Lights?
LED aluminum profiles are essential components for installing LED strip lights. They help to protect your LED strips, improve heat dissipation, and enhance the overall aesthetic of your lighting setup. If you’re looking to install LED aluminum profiles in your home or office, follow this simple step-by-step guide. As a professional LED aluminum profile manufacturer from China, we’ll also share helpful tips and provide insight into choosing the right profiles for your LED strip lights.
Learn how to install LED aluminum profiles for linear lighting step by step. Discover how to protect your LED strips, improve heat dissipation, and create an elegant lighting effect with these easy-to-follow instructions from a leading China LED aluminum profile supplier.
Installing LED aluminum profiles is not only about improving the performance of your LED strip lights, but it also adds a sleek and modern touch to your lighting design. Whether you're lighting up a kitchen, office, or outdoor space, these profiles can be used for various applications. Let’s break down the installation process to make it simple for you.
What Are LED Aluminum Profiles?
LED aluminum profiles are specially designed channels that house LED strip lights. These profiles are made from high-quality aluminum, which helps with heat dissipation, extending the lifespan of your LED strips. They are available in different sizes, shapes, and finishes to fit various lighting needs and interior designs. LED aluminum profiles, also known as LED aluminum extrusions or channels, are essential for creating professional-looking LED installations.
What Tools Do You Need to Install LED Aluminum Profiles?
To properly install LED aluminum profiles, you will need the following tools:
- Screwdriver (for securing the profiles)
- Measuring Tape (for precise measurements)
- Miter Saw (for cutting profiles to the desired length)
- Drill (for making mounting holes)
- Adhesive or Screws (depending on the mounting method)
- LED Strips (make sure they fit into the profile)
These tools will help you complete the installation process quickly and accurately.
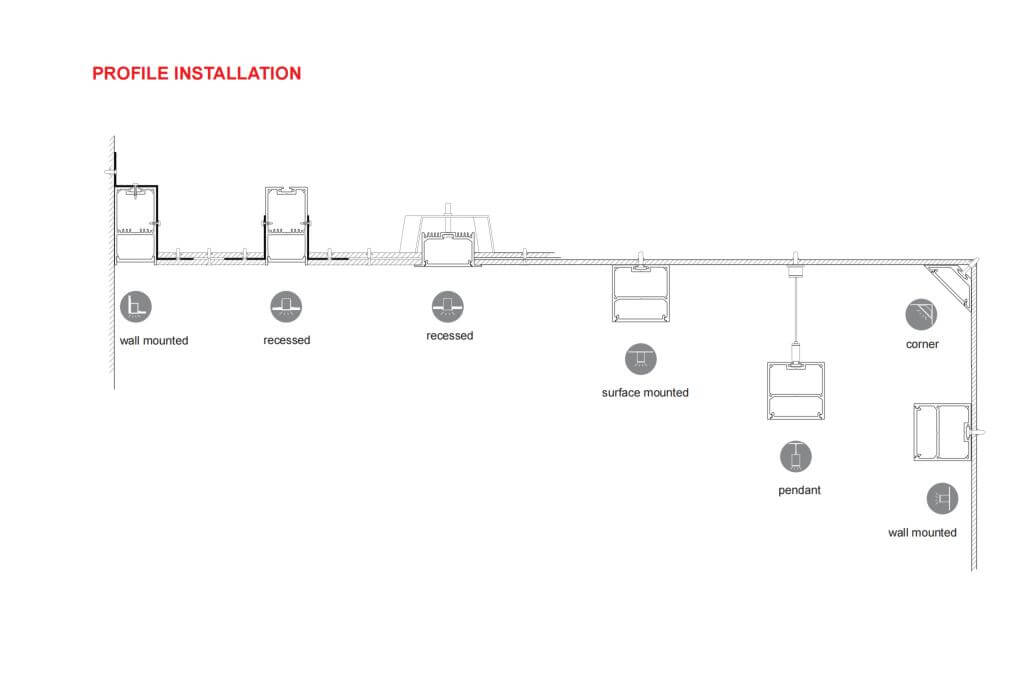
How to Install LED Aluminum Profiles Step by Step?
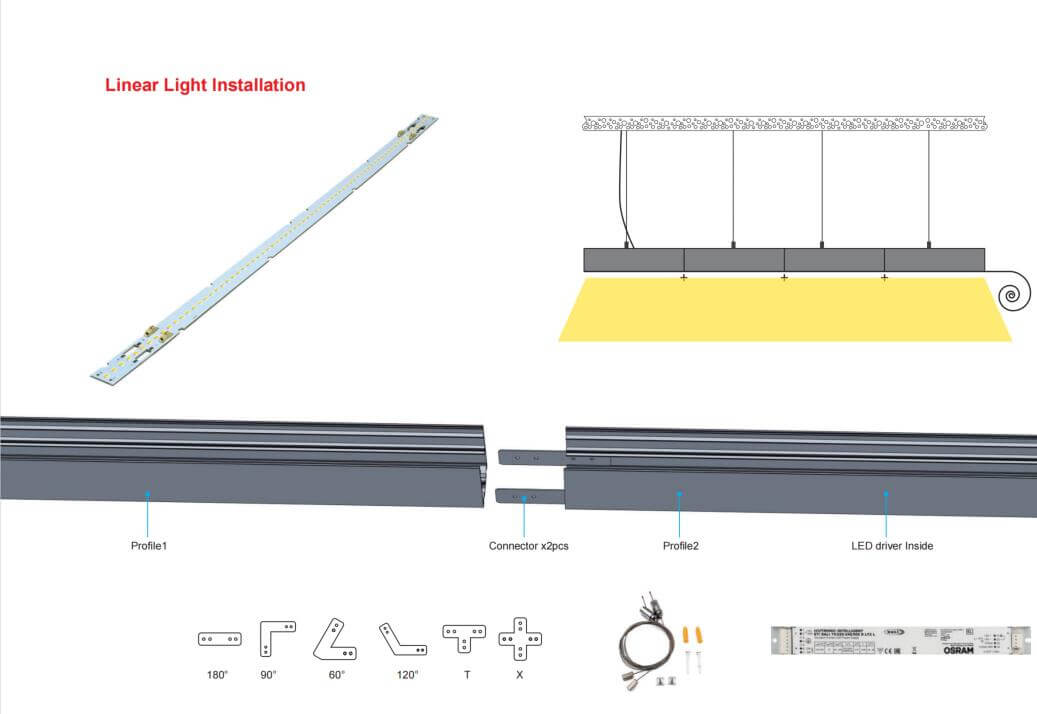
Follow these simple steps to install your LED aluminum profiles:
- Measure and Plan the Installation Area: Start by measuring the area where you want to install the LED aluminum profiles. Mark the points where the profiles will be placed, ensuring they are evenly spaced and aligned.
- Cut the Profiles to the Desired Length: Use a miter saw or hacksaw to cut the LED aluminum profiles to the required length. Be sure to wear safety glasses and gloves while cutting.
- Attach the Mounting Clips or Brackets: Depending on your profile design, you may need to use mounting clips or brackets to hold the profiles in place. Attach these to the wall or ceiling where the profiles will be installed.
- Insert the LED Strip Lights: Once the profile is securely mounted, carefully insert the LED strip lights into the aluminum channel. Make sure the LED strips are properly aligned and fit snugly within the profile.
- Connect the LED Strips to Power: Use the appropriate connectors or solder the wires to connect your LED strips to the power source. Ensure the voltage and power requirements are matched to avoid damage.
- Secure the Profile and Finish the Installation: Finally, secure the LED aluminum profiles to the mounting clips or brackets. If using adhesive, ensure it is properly bonded and holds the profile in place.
※ Claim 1: Ensure your LED aluminum profiles are compatible with the LED strips you're using to achieve optimal light output and cooling performance.
※ Claim 2: Make sure to check for any heat management issues when installing LED aluminum profiles in closed spaces to maintain the longevity of your LEDs.
What Are the Benefits of Using LED Aluminum Profiles?
LED aluminum profiles provide several advantages:
- Enhanced Heat Dissipation: The aluminum helps dissipate heat, preventing overheating and extending the lifespan of your LED strips.
- Improved Aesthetics: These profiles give your lighting setup a professional and sleek look, blending seamlessly with the interior design.
- Durability: LED aluminum channels are sturdy and protect your LED strips from physical damage and dust.
- Better Light Distribution: The profiles allow for uniform light diffusion, avoiding the “dots” effect often seen with bare LED strips.
How to Choose the Right LED Aluminum Profiles?
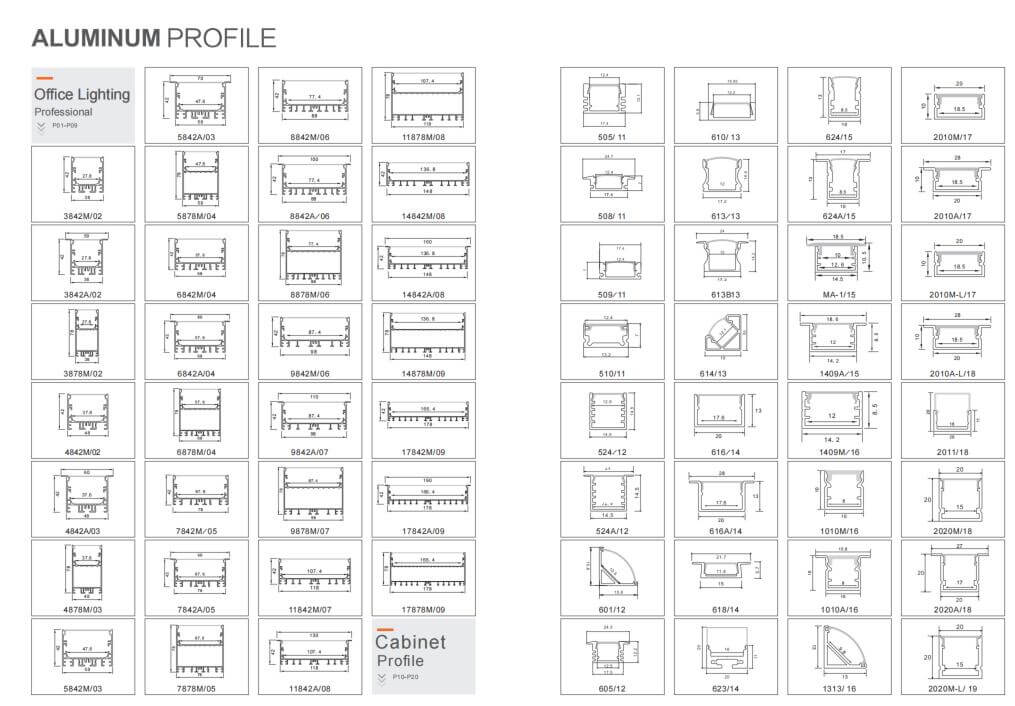
Choosing the right LED aluminum profile depends on several factors:
- Size and Shape: Consider the available space and the type of lighting effect you want to achieve.
- Mounting Type: Profiles can be surface-mounted, recessed, or suspended. Choose the one that suits your installation method.
- Finish: Opt for profiles with finishes that match the design of your room, such as anodized aluminum, matte black, or white.
※ Claim 1: As a leading China LED aluminum profile supplier, we offer a wide range of profiles to suit various installation needs and lighting effects.
※ Claim 2: You can find detailed information about our products and services on our website: Lightstec LED Aluminum Profiles.
Conclusion
Installing LED aluminum profiles is an excellent way to enhance the performance and appearance of your LED strip lights. By following these simple steps, you can achieve professional-looking lighting installations with ease. Whether you’re using LED strips for home decor or commercial spaces, these profiles will improve the longevity and efficiency of your lighting.
Q&A
1. Can I use any LED strip with aluminum profiles? Yes, as long as the LED strip fits into the profile, you can use any LED strip. Make sure the voltage and power ratings match.
2. How do I choose the right LED aluminum profile for my project? Consider the size, shape, and finish of the profiles to match your design needs. Also, choose profiles that fit your LED strips properly.
3. Do LED aluminum profiles improve light performance? Yes, they enhance heat dissipation, which helps maintain the performance and lifespan of your LED strips.
4. Can I install LED aluminum profiles outdoors? Yes, but ensure the profiles are designed for outdoor use and are properly sealed to prevent damage from weather.
5. How can I install LED aluminum profiles without drilling holes? You can use adhesive backing for a no-drill installation, though it may not be as sturdy as screws or clips.
People Also Care About These Questions:
- How to choose the right LED aluminum profiles for your project?
- What are the benefits of using LED aluminum extrusions?
- How to properly install LED strip lights in aluminum channels?
- What are the most common mistakes when installing LED aluminum profiles?
- What is the difference between LED aluminum channels and profiles?
LED Strip Lights Manufacturing Process
LED lighting production requires high precision, but many manufacturers make their lights on basic assembly lines. We strictly regulate and monitor all processing steps in our manufacturing system. We also have a full set of equipment designated for production and quality control. We employ experienced engineers who are also factory supervisors to ensure strict quality control for every single LED strip light.
We hope that this post will increase your understanding of the LED lighting industry and allow you to further develop and explore the product line.

Step 1. LED strip light material IQC
Materials arrived in the factory, no matter PCB, led, ic, resistance, aluminum profile, cables, need QC check. all the items need to meet the requirement. Quality Control is the first thing we have to do when all the materials arrive. We have to inspect them whether they are qualified or not --- however, there may still be some defective products that have gone through the whole process of production --- defects in materials, processing, or shipping.

Step 2. LED color temperature check
Now, with all new led chips, you need to test the LEDs color temperature. The brightness of the same color is not always the same. The Color Rendering Index is also a topic that you have to make sure the client.

Step 3. LED dry process
Usually, this process will be followed by the SMT process. LED needs to be dried before it is processing SMT. The temperature of the drying is not less than 65℃ in 8 hours.
Step 4. LED strip light SMT process
LED strip light SMT process is widely used in modern lighting units. What is funny is that SMT stands for Surface Mount Technology, but the technology on how to produce the LED is not just called mount surface but also includes a high-speed automated machine. Many people are misunderstanding this.

Step 5. LED strip light reflow soldering process
Reflow soldering technology process after SMT, the components, and PCB using the solder paste. The PCB from the reflow soldering machine into a certain temperature. The solder paste into the liquid consistency of melted, and then bonded to different components.

Step 6. LED strip light inspection process
we have 100% test to make sure there is no physical damage to the products. The visual inspection ensures that there is no color shift in the LEDs and if any components are misaligned in solder bridges.


Step 7. LED strip light soldering process
Some small-size PCB with the zero angle, lead free soldering process. After inspection, the LED ribbon passes through a soldering machine, which connects 0.5m ribbon to 5m long strips.

Step 8. LED strip light PCB clean process
The PCB surface for the LED strip has a soldering iron to clean. The first thing to do is still soldering. Solder the IC can be used to prevent oxidization during the soldering process, and then cut off the excess lead wire into a round toothpaste drum, like oxidation. After all of this is completed, we can continue to clean it.

Step 9. LED strip light ageing process
In fact, all the led product needs a lighting test for 8 hours, to ensure each LEDs runs in good condition. And we can measure the colors during the lighting test, and whether the LEDs are in the right color temperature, and whether the driver working well. So this is very important for the manufacturer to make sure every LEDs is ok.
Step 10. LED strip light waterproof process
LED strip lights are waterproof and also rust resistant, which make them suitable for a number of applications inside and outside the house. LED strip light waterproofing process selection is an important step in the manufacturing process. There are high quality IP65 silicon tube waterproof and IP67 silicon injection waterproof available on the market.

Step 11. LED strip light add 3M tape process
The 3M tape on the strip’s backside provides consumers with convenience and ease in installing LED strip lighting.
We use 3M 9080 for all the non-waterproof and waterproof strip, some customers request other 3M adhesive with better stickiness or better thermal conductivity, that’s available as well.

Step 12. LED strip light final inspection
After the entire LED strip package has passed through our processing, LED Starlight's quality control department will perform a final check on our products. We not only make sure they have the same lighting color and are free from defects but also the appearance is good enough to meet the customers' requirements.
